The material below is from the Apache axis site and another web site with the examples modified and in greater detail.
The example elaborated below is to secure the StockQuoteService that comes with the Axis samples.(AXIS_HOME\samples\stock).
Prerequisite :
1)Configure Axis on Tomcat
2)Download wss4j and add the jar in the class path
<a href="http://www.apache.org/dyn/closer.cgi/ws/wss4j/">http://www.apache.org/dyn/closer.cgi/ws/wss4j/</a>
3)Make sure that all the required axis jar files are in the class path.Also the jar file opensaml-1.1.jar is required in the class path.
The steps are outlined below :
1)Create a deployment descriptor (deploy.wsdd) with the below contents.Note that the username token is added.
<deployment xmlns="http://xml.apache.org/axis/wsdd/" java="http://xml.apache.org/axis/wsdd/providers/java"> </deployment>
<service name="stock-wss-01" provider="java:RPC" style="" use="literal"> </service>
<requestflow> </requestflow>
<handler type="java:org.apache.ws.axis.security.WSDoAllReceiver"> </handler>
<parameter name="passwordCallbackClass" value="PWCallback"> </parameter>
<p><parameter name="action" value="UsernameToken"> </parameter>
<parameter name="className" value="samples.stock.StockQuoteService"> </parameter>
<parameter name="allowedMethods" value="getQuote"> </parameter></p><p><parameter name="scope" value="application"> </parameter>
<parameter name="passwordCallbackClass" value="PWCallback">
</parameter>
The WSDoAllReceiver is an Axis handler located in wss4j.jar package. This is the standard way to deploy an Axis handler. For more details please refer to the Axis handler for WSS4J documentation.
2)Deploy the service (using AxisAdmin). java org.apache.axis.client.AdminClient -lhttp://localhost:8080/axis/services/AdminService deploy.wsdd
3)Create a class named PWCallback.java and compile it and put the resulting PWCallback.class file into your Axis WEB-INF/classes directory. (under the appropriate package - samples/stock/client)
The following code snippet shows a simple password callback class:
package samples.stock.client;
import java.io.IOException;
import javax.security.auth.callback.Callback;
import javax.security.auth.callback.CallbackHandler;
import javax.security.auth.callback.UnsupportedCallbackException;
import org.apache.ws.security.WSPasswordCallback;
public class PWCallback implements CallbackHandler {
public void handle(Callback[] callbacks) throws IOException, UnsupportedCallbackException {
for (int i = 0; i < pc =" (WSPasswordCallback)callbacks[i];" href="http://localhost:8080/axis/services/stock-wss-01?wsdl">http://localhost:8080/axis/services/stock-wss-01?wsdl</a>
A bunch of java classes will be created under samples/stock/client, including the StockQuoteServiceServiceLocator.
5)Create a deployment descriptor file (client_deploy.wsdd) for the client: <deployment xmlns="http://xml.apache.org/axis/wsdd/" java="http://xml.apache.org/axis/wsdd/providers/java">
<transport name="http" pivot="java:org.apache.axis.transport.http.HTTPSender">
<requestflow><deployment xmlns="http://xml.apache.org/axis/wsdd/" java="http://xml.apache.org/axis/wsdd/providers/java">
<transport name="http" pivot="java:org.apache.axis.transport.http.HTTPSender">
<globalconfiguration>
<requestflow>
<handler type="java:org.apache.ws.axis.security.WSDoAllSender">
<parameter name="action" value="UsernameToken">
<parameter name="user" value="wss4j">
<parameter name="passwordCallbackClass" value="samples.stock.client.PWCallback">
<parameter name="passwordType" value="PasswordDigest">
</parameter>
</parameter>
</parameter>
</parameter>
<parameter name="passwordCallbackClass" value="samples.stock.client.PWCallback">
</parameter>
6)Write the below client class that invokes the service.
package samples.stock.client;
import java.rmi.RemoteException;
import javax.xml.rpc.ServiceException;
public class StockServiceClient {
public StockServiceClient() {
}
public static void main(String[] args) throws ServiceException, RemoteException {
if (args.length == 0) {
System.out.println("Usage:\njava StockServiceClient [symbol]");
return;
}
StockQuoteServiceService locator = new StockQuoteServiceServiceLocator();
StockQuoteService service = locator.getStockWss01();
float quote = service.getQuote(args[0]);
System.out.println("stock quote service returned " + args[0] + ": " + quote);
}
}
7)Define the system property axis.ClientConfigFile for your client:
java -Daxis.ClientConfigFile=client_deploy.wsdd -classpath $AXISCLASSPATH samples.stock.client.StockServiceClient
Make sure that your CLASSPATH includes the jar files under WEB-INF/lib.
Another way to do this is to specify the wsdd file in your StockServiceClient to the service locator programmatically:
...
import org.apache.axis.EngineConfiguration;
import org.apache.axis.configuration.FileProvider;
...
EngineConfiguration config = new FileProvider("client_deploy.wsdd");
StockQuoteServiceService locator = new StockQuoteServiceServiceLocator(config);
...
8)Run the client, you should get no errors:
java samples.stock.client.StockServiceClient XXX
stock quote service returned XXX: 55.25
Your client is now sending a Username Token in the wsse request header with the username "wss4j" (see client_deploy.wsdd) and password "security" (see the PWCallback implementation).
9)Try modifying your client's PWCallback to return the wrong password, or send the wrong username. The service should reject your requests.</handler></requestflow></globalconfiguration></transport></deployment></requestflow></transport></deployment>
Wednesday, February 22, 2006
Tuesday, February 14, 2006
Setting up SVN on Apache
SVN + Apache Configuration
* I am following the nice, 300 page downloadable SVN book. Gotta love this.
* You must use Apache 2.0. Luckily, I am.
* First, if you have not done so, create an SVN repository. For example, you use
[shell> svnadmin create /home/subversion/test
[shell> svn import /some/other/directory file:///home/subversion/test
* If necessary, grab and install the mod_dav_svn stuff with yum. First, log in as root. Then
[shell> yum install mod_dav_svn
* But check the version of svn that you get this way. The SVN specific authorization stuff described below
only works with SVN 1.x, but yum (on my old Fedora 1) gave me 0.32.
* If necessary, copy the downloaded .so modules and conf files into your apache directory. However,
I noted that stuff was already in my Apache 2.0 installation.
* Edit httpd.conf to add any modules.
#SVN modules
#LoadModule dav_module modules/mod_dav.so
LoadModule dav_svn_module modules/mod_dav_svn.so
LoadModule authz_svn_module modules/mod_authz_svn.so
* Add some locations. For multiple repos, do something like this:
<Location /svn>
DAV svn
SVNParentPath /home/subversion
</Location>
This will map everything under http://your.host/svn to /home/subversion. For example,
the repository test under /home/subversion/test (as we created above) can be accessed
via http://your.host/svn/test.
* Point your browser at http://localhost/svn/test and you should see your files.
* For even more fun, open http://localhost/svn/test as a web folder (ie using
builtin MS WebDAV clients) or any other DAV client. You may notice it does not
require authentication, but (at least for me) write access is not working.
* HTTP AuthN and AuthZ can be set up to solve this in a coarse way. Start by
making a password.
[shell> htdigest -c /etc/httpd/password/digest "Subversion repository" ogce
See for example the bottom of http://httpd.apache.org/docs/1.3/howto/auth.html (note this still works
for Apache 2.0).
* Next add the following stuff to the <Location/>:
<Location /svn>
DAV svn
SVNParentPath /home/subversion/
AuthType Digest
AuthName "Subversion repository"
AuthDigestFile /etc/httpd/password/digest
<LimitExcept GET PROPFIND OPTIONS REPORT>
Require valid-user
</LimitExcept>
</Location>
* Note that the AuthName must match the realm name used with htdigest.
* The <LimitExcept> business means that if you try to do anything other than a few
read-like operations, you will be prompted for a password.
* I found this to be a bit flaky and unpredictable, but luckily after some false
starts I got Subversion access control to work correctly (ie I upgraded to
version 1.1 of svn and the apache svn mods). My modified httpd.conf file entry
now looks like this:
<Location /svn/>
DAV svn
SVNParentPath /home/subversion/
AuthzSVNAccessFile /etc/httpd/conf/svnserver.conf
AuthType Digest
AuthName "Subversion repository"
AuthDigestFile /etc/httpd/password/digest
Satisfy any
Require valid-user
</Location>
The "Satisfy any" and "Require valid-user" are a little at odds, but this is resolved
with the AuthzSVNAccessFile entries described below. "Satisfy any" simply means
"accept any authentication requirements that we will impose."
* The AuthzSVNAccessFile that you specify to be svnserver.conf has entries such as the following:
[test:/]
* = r
ogce = rw
This means "On the test repository and all of its children, give everyone read access and
give the ogce user both read and write access." Thus when you try to import or commit, you will be
prompted for a username and password.
* The SVN authz file can also provide more fine-grained access. For example, I may want to make
all of the projects EXCEPT one called tomcat-plugin2 world readable and make tomcat-plugin2
accessible only by an authenticated user. I do this with the following contents of svnserver.conf:
[test:/]
* = r
ogce = rw
[test:/tomcat-plugin2]
*=
ogce = rw
Navigating to this tomcat-plugin2 directory will cause a password prompt window to appear. If I
login as the indicated user, I can access the rest of this project.
* Check at this point to make sure all of your svn commands work over http:
svn import http://your.host/svn/test/your_project_dir/
svn list http://your.host/svn/test/your_project_dir
svn checkout http://your.host/svn/test/your_project_dir
svn commit
You should be prompted for a password on the write operations (import, commit) although
svn seems to remember you after the first login. Looks like this is stored in ~/.subversion/auth
* The svn commit command assumes you have made some modifications to your checkout. If so,
you should be prompted for a password before this gets accepted (if you have configured
everything correctly).
Monday, February 13, 2006
Get MyProxy credentials from Globus using COG kit on local client machine
1)Install the latest version of COG Kit on your machine
2)Set up the required keys and properties on your account in the server where globus is installed.For instance : on your account on gf1.ucs.indiana.edu, follow the steps outlined in the below link :
http://grids.ucs.indiana.edu/users/manacar/myproxy/myproxy%20guidelines.htm
For the keys, mail Mehmet (mnacar@indiana.edu)
Note that in the last step , myproxy-init :
The password given in 'GRID pass' is the GF1 password and the password given in 'MyProxy pass' is any password of your choice.This is the password that should be in your program to retreive MyProxy credentials.
myproxy-init
Enter GRID pass phrase for this identity:
Creating proxy .................................................. DoneProxy
Verify OKYour proxy is valid until: Tue Feb 7 15:15:24 2006
Enter MyProxy pass phrase:
Enter MyProxy pass phrase:
3)Client program to get My Proxy details :
- Write a program on your local machine to access gf1 and retreive MyProxy credentials with the following values for the properties.
int port = 7512;
String hostName = "gf1.ucs.indiana.edu";
int lifeTime = 2 * 60 * 60;
MyProxy myproxy = new MyProxy(hostName, port);
GSSCredential proxy = myproxy.get("sajay","test123",lifeTime);
- Testing the above code to retrive the values of MyProxy as below :
GSSCredential proxy = proxyAccessor.getProxy();
System.out.println( proxy.getRemainingLifetime());
System.out.printlnproxy.getName().toString());
Result :
getLifetime() = 0
getName() = /C=US/O=Indiana University/OU=Community Grids Lab/CN=Smitha Ajay
Thursday, February 09, 2006
installation of Axis and Taverna
Tuesday, February 07, 2006
Maven 2 Plugin Goal Quick Notes
My previous Maven plugin examples had only one goal, but mavenites know that plugins
typically have many separate goals. For example, see the
War Plugin Goals.
Each goal correpsonds to a separate piece of Java code. The source is
here
You will notice each Mojo has a separate "@goal" in the top level comments, above the class definition.
Note that all of these classes correspond to the same plugin. Apparently Maven will inspect the contents of the plugin's jar to find the class with the appropriate @go definition and load it.
Monday, February 06, 2006
Maven 2 Notes, Part 6: Multiproject Builds
****************************************************************
Maven 2 Notes, Part 6: Multiproject Builds
****************************************************************
----------------------------------------------------------------
Section 1: Basics for Building Multiple Maven Projects
----------------------------------------------------------------
* Maven 1's multiproject builds were notorioulsy vague and mysterious.
Fortunately Maven 2 seems to have cleaned things up, starting with
the directory structure.
* Now, sensibly, the directory structure is what you would expect:
the multiproject has a parent directory and various child directories.
Presumably the children can have children of their own, but this is
something to test.
* Maven 2's "Getting Started Guide"
http://maven.apache.org/guides/getting-started/index.html
has a pretty good overview, so I'm using this as a starting point. I'll
try to deviate a few places to keep it interesting.
* Multiproject builds are also sensibly related to the inheritance mechanism.
But note that this works even if you run the maven commands in the parent
directory: it will search for all pom.xml files in all of the children.
* To test this out, I created a shell of a real problem: we must in the OGCE
project build a ProxyManager portlet (as a war) that itself depends on several
other jars. We can simulate this by creating the following projects:
o Parent: a shell project with only a pom.xml and no source code.
o Child1: a standard project that creates a jar.
o Child2: a webapp project that creates a war.
Both projects extend the parent and additionally Child2 depends on the jar created
by Child1.
* Set all of this up with Maven's archetype:create tools. Here is my edited UNIX history:
1393 mvn archetype:create -DgroupId=xportlets.multitest -DartifactId=parent
1394 cd parent
1396 mvn archetype:create -DgroupId=xportlets.multitest -DartifactId=child1
1398 mvn archetype:create -DgroupId=xportlets.multitest -DartifactId=child2 -DarchetypeArtifactId=maven-archetype-webapp
Recall that these simple artifact steps create dummy java programs, as we
discussed in an earlier blog:
http://communitygrids.blogspot.com/2005/11/using-maven-2-part-1.html
* Our next step is to modify the generated pom.xml files, starting with the parent.
We need to do two things:
1. Change packaging from "jar" to "pom".
2. Add <modules> tags to specify by name the child artifacts.
My modified pom.xml looks like this.
<project>
<modelVersion>4.0.0</modelVersion>
<groupId>xportlets.multitest</groupId>
<artifactId>parent</artifactId>
<version>1.0-SNAPSHOT</version>
<name>The Parent</name>
<url>http://maven.apache.org</url>
<!-- Change this to pom -->
<!-- "pom" packages don't need source code! -->
<packaging>pom</packaging>
<!-- Ad these lines -->
<modules>
<module>child1</module>
<module>child2</module>
</modules>
</project>
I note that the <module></module> values are probably artifactIds
of the associated pom.xml files. This (by default) will scan the
directory "parent" for matching sub-directories named "child1" and
"child2". A little fooling around revealed
1. Child directory names are important. The project named
"child2" must be in a directory named parent/child2.
2. There does not seem to be a way to provide alternative
locations for child projects.
* Note also that our parent project has the packaging value of "pom".
This means that the project does not need any source: it only
exists to put its pom.xml in local and remote repositories.
I was so excited, I decided to boldface the above text, since it applies to
the portlet download pom.xml files we discussed in previous blogs.
* We may also add a <parent> definition to the pom.xml files
of both of the children. This is the simple inheritance that
we saw before. I think this is optional. It seems that way from
my early tests.
<project>
<!-- Optionally add this -->
<parent>
<groupId>xportlets.multitest</groupId>
<artifactId>parent</artifactId>
<version>1.0-SNAPSHOT</version>
</parent>
<modelVersion>4.0.0</modelVersion>
<groupId>xportlets.multitest</groupId>
<artifactId>child2</artifactId>
<packaging>war</packaging>
<version>1.0-SNAPSHOT</version>
<name>Child #1</name>
<url>http://maven.apache.org</url>
<dependencies>
<dependency>
<groupId>junit</groupId>
<artifactId>junit</artifactId>
<version>3.8.1</version>
<scope>test</scope>
</dependency>
</dependencies>
<build>
<finalName>child2</finalName>
</build>
</project>
* You run all of this from the parent directory. If you issue the
command
[gateway@gridfarm002 parent]$ mvn install
You get
[INFO] Scanning for projects...
[INFO] Reactor build order:
[INFO] The Parent
[INFO] Child #1
[INFO] Child #2
...
And so on.
* After running the command, you will note that the appropriate "install" phase
build process is executed in parent and in each of the children.
* Note this is a bit different from our earlier use of inheritance,
http://communitygrids.blogspot.com/2006/01/using-maven-2-part-5-payoff-at-last.html
.
In the earlier examples, the child project would scan the local and remote repositories for
the parent's pom.xml, downloading project parts as necessary. There we were running the "mvn"
command from within the child directory. Here we are running it from within the parent.
----------------------------------------------------------------
Section 2: Inter-Project Dependencies
----------------------------------------------------------------
* The order of project builds must be deterministic if there are
dependencies.
* First, let's see what happens if I rename Child1 Child3 and update
directories, artifactIds, and names accordingly. Simply making these
superficial changes does not change the order that the modules are
executed. The order seems to be defined by the parent pom.xml's
<module> entry order. If I specify the order to be
<modules>
<module>child2</module>
<module>child3</module>
</modules>
then I get
[gateway@gridfarm002 parent]$ mvn clean install
[INFO] Scanning for projects...
[INFO] Reactor build order:
[INFO] The Parent
[INFO] Child #2
[INFO] Child #3
Switching this back to
<modules>
<module>child3</module>
<module>child2</module>
</modules>
causes Child3 to be built first.
* Ordering here is fine, but now we need to examine inter-project dependencies. Let's make
Child2 (a war build) dependent on the jar created by Child3. Add the following to your
child2's pom.xml.
<dependencies>
<dependency>
<groupId>xportlets.multitest</groupId>
<artifactId>child3</artifactId>
<version>1.0-SNAPSHOT</version>
<scope>compile</scope>
</dependency>
</dependencies>
This is the usual dependency. Also, change the module order to this:
<modules>
<module>child2</module>
<module>child3</module>
</modules>
This will prevent the cheap victory of compiling child3 first by default: we want to
force the project to check dependencies. A quick check confirms this:
[gateway@gridfarm002 parent]$ mvn install
[INFO] Scanning for projects...
[INFO] Reactor build order:
[INFO] The Parent
[INFO] Child #3
[INFO] Child #2
Removing the dependency of #2 on #3 reverses this order--it defaults to the module order.
----------------------------------------------------------------
Section 3: Dendency Management
----------------------------------------------------------------
* In a slight detour, we'll look at Maven 2's mechanism for handling
dependencies. This allows maven multi-projects to centralize their comprehensive dependency list.
This means you will need to edit only one file, for example, if you need to update a
particular jar version.
* This is described at
http://maven.apache.org/guides/introduction/introduction-to-dependency-mechanism.html
. However, I found it a bit confusing at first.
* As we have seen before, a child inherits all dependencies of its parent. However,
we often have the problem that two or more children will need to inherit a different
subset of the dependencies of the entire project. Although it makes bookkeeping simpler,
we don't want to make Child1 depend on jars that it doesn't need, just because Child2 needs them.
* For example, we have often used the Junit dependency--see the pom.xml files above. We can put this in the parent's pom.xml.
<dependencyManagement>
<dependencies>
<dependency>
<groupId>junit</groupId>
<artifactId>junit</artifactId>
<version>3.8.1</version>
<scope>test</scope>
</dependency>
</dependencies>
</dependencyManagement>
Let's say now that Child3 will need Junit but Child2 will not. Both of course extend the parent pom.xml
in the usual way. In Child3, we place following abbreviated dependency:
<dependency>
<groupId>junit</groupId>
<artifactId>junit</artifactId>
</dependency>
Note we omit the scope, version and anything else. All of this gets inherited from the parent's master definition list. In Child2 we put none of this information, and the jar will not be used in any phase of Child2's build.
* On the other hand, we may want Child2 to include junit.jar in its WAR download. This means that
junit has a different scope (compile or similar) than the default scope. We manage this by simply as follows:
<dependency>
<groupId>junit</groupId>
<artifactId>junit</artifactId>
<scope>compile</scope>
</dependency>
</dependencies>
That is, we add the <scope> parameter and override the default.
Wednesday, February 01, 2006
Using Taverna to run a HTTPS web service
The below steps outline how to run a web service on HTTPS(HHTP-SSL) using Taverna.
1. Make sure the initial set up is in place.This involves :
- Installing Axis1.3
- Installing Tomcat(latest version) and configure axis to run on tomcat
- Install Taverna
2. Configure Tomcat to run on SSL
For details, refer to the below link.
http://tomcat.apache.org/tomcat-4.0-doc/ssl-howto.html
The following steps would suffice to use the default path and password.This assumes that jdk1.5 and above is already installed.
- Create a certificate keystore :
c:\JAVA_HOME%\bin\keytool -genkey -alias tomcat -keyalg RSA and enter options as shown below.
C:\Program Files\Java\jdk1.5.0_06\bin>keytool -genkey -alias tomcat -keyalg RSA
keystore password: changeit
What is your first and last name? [Unknown]: localhost (note : this should be localhost for dev testing purposes)
What is the name of your organizational unit? [Unknown]: IUB
What is the name of your organization? [Unknown]: IUB
What is the name of your City or Locality? [Unknown]: BL
What is the name of your State or Province? [Unknown]: IN
What is the two-letter country code for this unit? [Unknown]: US
Is CN=localhost, OU=IUB, O=IUB, L=BL, ST=IN, C=US correct? [no]: y
This would create a .keystore file in the user's directory.
Note: If a keystore was created earlier with the alias tomcat, that must be deleted before executing the above commad.
c:\JAVA_HOME%\bin\keytool -delete -alias tomcat -keypass changeit
- Edit the tomcat server.xml file ($CATALINA_HOME/conf/server.xml) to uncomment the SSL
element completely. - Test the SSL by opening a browser, type https://localhost:8443. This should bring up the tomcat page.
3. Create a certificate : A certificate should be exported from the browser.The below screen shots use IE.
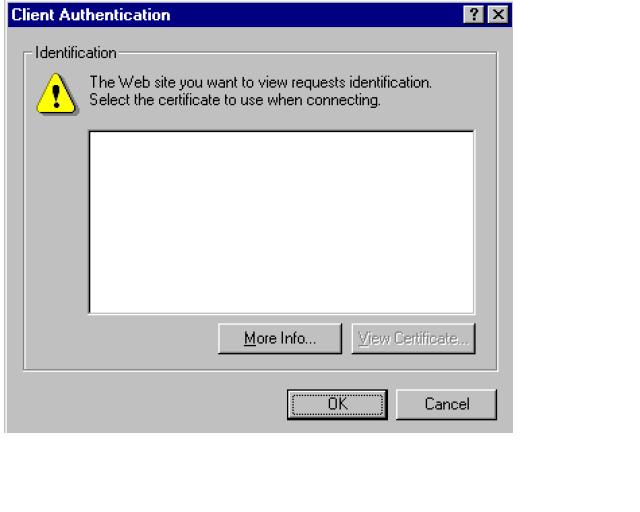
- Type https://localhost:8443 and the below client authentication screen will pop up .Click Ok.
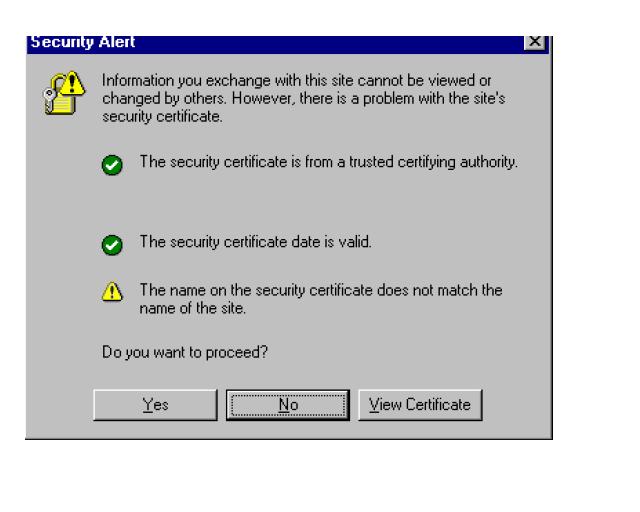
- On the security alert screen click on View Certificate
- The certificate can be viewed.Click on the 'Details' tab

- On the Details tab, click 'Copy To File'

- Click next on the certificate manager export wizard

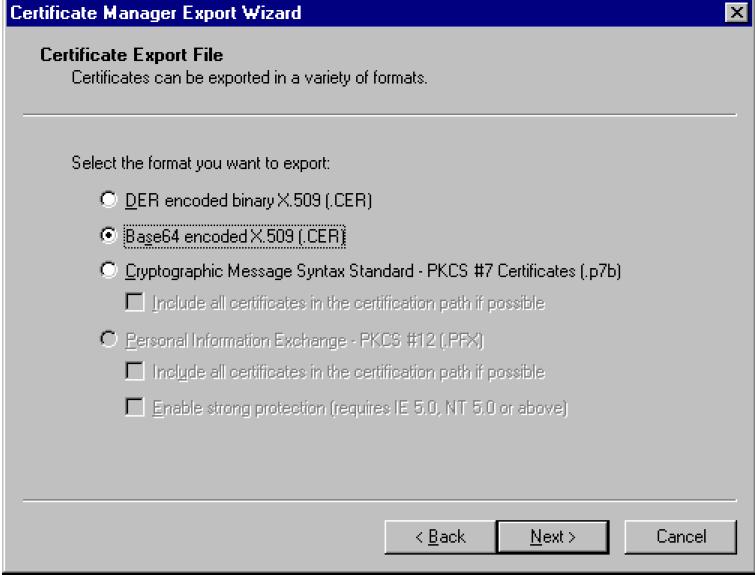
- Select a format
- Export the certificate by entering the name of the .cer file and location

- Click on Finish

- import this certificate using the below command
C:\...JRE..\bin\ keytool - keystore C:\jre\lib\security\cacerts -import -file c:\mycert.cer
Enter keystore password : changeit
Next the owner and issuer details are displayed.Verify that the CN =localhost.
Type 'y' in the prompt - Trust this certificate [no] :
The final message must be 'Certificiate was added to keystore'.
Note: If an import was done earlier, delete that alias before importing:
C:\JAVA_HOME\bin>keytool -keystore "C:\jre1.5.0_06\lib\security\cacerts" -delete -alias mykey
Enter keystore password: changeit
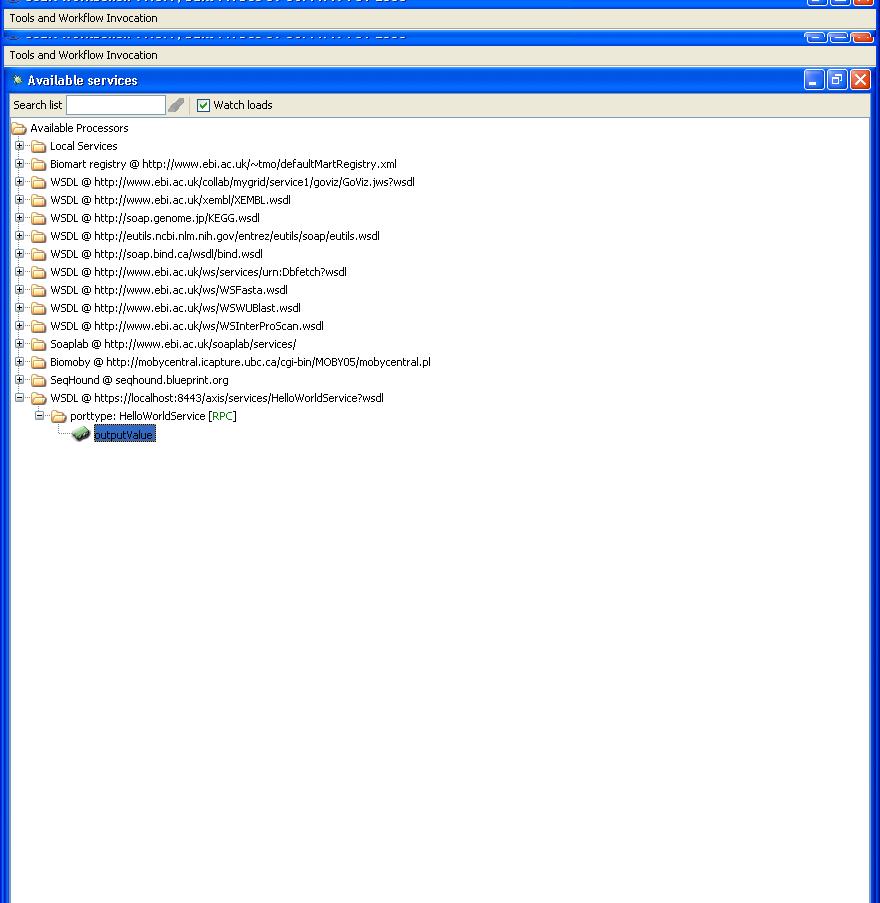
4. Start taverna and add a new WSDL scavenger with the WSDL URL of the webservice on https.
The 'add new WSDL scavenger' should take place successfully and it should appear in the list of processes.
5. Run the workflow and check for success message.

Subscribe to:
Posts (Atom)