- Edit skins/MonoBook.php and whack or comment out this section:
<div class="portlet" id="p-logo">
<a style="">text('logopath') ?>);"
href="<?php echo htmlspecialchars($this->data['nav_urls']['mainpage']['href'])?>"
title="<?php $this->msg('mainpage') ?>"></a>
</div>
This removes the logo gif and also the image hyperlink. - Edit skins/monobook/main.css to change the following:
#column-one {
/* padding-top: 160px;*/
padding-top: 40px
}
Use any value you like for the padding.
Friday, December 15, 2006
Whacking MediaWiki's Monobook to Remove Logo
To get rid of the MediaWiki logo in the default monobook, do this.
Wednesday, December 13, 2006
More JSP Hacking in JSF
Previously I put some notes on using JSP EL in JSF pages. The useful thing for me was that you could embed EL in JavaScript such as Google Map API calls. But this only goes so far. For example, suppose you want to iterate over a String array that is defined in your backing bean. You can't do the following, unfortunately:
<script>
for(i=0; i < ${mybean.myStrings.length} ; i++ ) { document.write(${mybean.myStrings[i]}) } </script> ${mybean.myStrings.length} will work (if I recall correctly). The problem is that the EL expression inside the loop must be evaluated on the server side when the JSP/JSF page is created, but the JavaScript is processed by the browser. If you really needed to do something like the above, you have to drive the loop with Java inside your JSF page. First, of course, you should realize your JSF backing session beans will be available in the usual way through the built-in JSP session object. <% MyBean mybean=(MyBean)session.getAttribute("mybean");
for(int i=0;i < mybean.myStrings.length;i++){
%>
<script>
document.write(<% myBean.myString[i] %>);
</script>
<%
}
%>
This example is really artificial, of course, but there really are cases when I needed to do things like this. OK, probably there is a better way.
<script>
for(i=0; i < ${mybean.myStrings.length} ; i++ ) { document.write(${mybean.myStrings[i]}) } </script> ${mybean.myStrings.length} will work (if I recall correctly). The problem is that the EL expression inside the loop must be evaluated on the server side when the JSP/JSF page is created, but the JavaScript is processed by the browser. If you really needed to do something like the above, you have to drive the loop with Java inside your JSF page. First, of course, you should realize your JSF backing session beans will be available in the usual way through the built-in JSP session object. <% MyBean mybean=(MyBean)session.getAttribute("mybean");
for(int i=0;i < mybean
%>
<script>
document.write(<% myBean.myString[i] %>);
</script>
<%
}
%>
This example is really artificial, of course, but there really are cases when I needed to do things like this. OK, probably there is a better way.
Monday, December 11, 2006
Gnuplot + PNG on MacBook Pro
Some notes on getting Gnuplot to print PNG on my Mac: I used Gnuplot 4.0.0, which installed with no problems, but Mac doesn't have the required zlib and png libraries (or at least they weren't in /usr/local, where ./configure could find them).
So the steps are
So the steps are
- Get zlib, run ./configure, make and then sudo make install.
- Get png, run ./configure, make and sudo make install
- And then reinstall gnuplot with ./configure, make, sudo make install.
Friday, December 08, 2006
Dirty Tricks with JSF and JSP EL
JSF's great weakness is that you often need to break out of the JSF tag library cocoon when developing the web pages to be rendered. For example, let's say you need to pass a variable value that is set in your backing been to some section of JavaScript. The JSP 2.x Expression Language is the way to do this. It requires Tomcat 5.x, so if you are still using Tomcat 4...well, the first decade of the 21st century is winding down. It's time to upgrade.
Anyway, you probably are already set up to do this. So lets assume you have to set a value in a Google Map object from your backing bean:
<script>
...
map.center(new GPoint (-117.24, 33.03),10);
</script>:
In a JSF application, the lat/lon values (33.03, -117.24) will be in something like a MapBean.java class, which you call mapBean in your faces-xml.config file. So how do you get these values into the JavaScript? You do it with JSP EL (not JSF EL). This will be active in your page unless you explicitly turn it off (and why would you do that?) so just place your javascript fragment inside the f:view tags and then use
map.center(new GPoint(${mapBean.valueY}, ${mapBean.valueX}),10);
There is one dirty (or crafty, if you prefer) trick to this: you need to initialize the mapBean object in the page. JSF normally takes care of this in the process of rendering its own EL expressions, or you could do it explicitly the JSP way (I suppose). But let's say you want to use JSP EL exclusively for your page (and avoid the obscurities of JSF tags), or perhaps you just don't have any JSF tags in this particular page. The problem is that the mapBean object will not be instantiated in the page--mapBean.valueY will return an empty String. To work around this, you could use the following evil shortcut:
<h:outputText value="#{mapBean.valueX}" rendered="false"/>
The actual value you use here doesn't matter (it doesn't need to be valueX, could be any other property in mapBean). This will force the mapBean object to be initialized and yet won't render the associated value.
Monday, November 27, 2006
Linking Multiple SVN Repositories
Semi-autonomous SVN repositories can be linked together, so you can avoid monolithic repository setups. See chapter and verse of the SVN red bean book for instructions.
Monday, November 20, 2006
Maven 2 and Eclipse
Here's some info courtesy of Mehmet A. Nacar on using Maven 2 in eclipse:
There is a maven2 eclipse plugin available at http://m2eclipse.codehaus.org/ or http://maven.apache.org/eclipse-plugin.html.
You can see a demo of what it can do here: http://m2eclipse.codehaus.org/Maven_2.0_Plugin_for_Eclipse.html
There is a maven2 eclipse plugin available at http://m2eclipse.codehaus.org/ or http://maven.apache.org/eclipse-plugin.html.
You can see a demo of what it can do here: http://m2eclipse.codehaus.org/Maven_2.0_Plugin_for_Eclipse.html
Thursday, November 09, 2006
Testing Portlets with HttpUnit, JMeter, and Maven
I wrote up a guide for testing portlets with HttpUnit + Maven and with JMeter. Get it from here.
HttpUnit is good for automated build testing, and JMeter is a powerful way to hammer your portal.
I based the HttpUnit code examples on stuff that Marcus Christie wrote.
I note he is also using MY blog template.
HttpUnit is good for automated build testing, and JMeter is a powerful way to hammer your portal.
I based the HttpUnit code examples on stuff that Marcus Christie wrote.
I note he is also using MY blog template.
Monday, November 06, 2006
Goodbye Hollow World
As you can tell, the blog name has changed but the URL is the same. The old name, "Hollow World", was a pun based on the ubiquitous use of "hello, world" examples when learning new programming languages, development environments, etc.
Sunday, November 05, 2006
Friday, November 03, 2006
JSF Portlets with MyFaces Portlet Bridges, and
I've had reasonable luck building JSF JSR 168 portlets with the Apache Portlet Bridge in GridSphere. I've experimented with this in Jetspeed2, should work generally. I like to start with a standalone JSF application, get it to work, and then (with a little fussing around with config files) convert it to a portlet.
There is a Maven 2 MyFaces project archetype that is described nicely (by Evan and Martin--you know who you are) on our VLAB Wiki.
As a starting point, here are standalone Maven 2 pom.xml and web.xml files. These will be generated by the nice archetype.
After you have gotten your app working in standalone mode, you are now ready to convert it into a portlet. Some of these details will be specific to the container you are using, but in general you will need to
Here are the details. First, add the following dependencies to your POM:
<!-- Portlet Dependencies -->
<dependency>
<groupId>javax.portlet</groupId>
<artifactId>portlet-api</artifactId>
<version>1.0</version>
<scope>provided</scope>
</dependency>
<dependency>
<groupId>org.apache.portals.bridges</groupId>
<artifactId>portals-bridges-commons</artifactId>
<version>1.0</version>
</dependency>
<dependency>
<groupId>org.apache.portals.bridges</groupId>
<artifactId>portals-bridges-jsf</artifactId>
<version>1.0</version>
</dependency>
A full example of pom.xml for the portlet is here..
For GridSphere, we need to add the following xml snippet to the web.xml:
<servlet-mapping>
<servlet-name>PortletServlet</servlet-name>
<url-pattern>/jsr/RDAHMM-portlet</url-pattern>
</servlet-mapping>
A full example of the portlet's web.xml (for GridSphere) is here.
There is a Maven 2 MyFaces project archetype that is described nicely (by Evan and Martin--you know who you are) on our VLAB Wiki.
As a starting point, here are standalone Maven 2 pom.xml and web.xml files. These will be generated by the nice archetype.
After you have gotten your app working in standalone mode, you are now ready to convert it into a portlet. Some of these details will be specific to the container you are using, but in general you will need to
- Create a portlet.xml file, placed in WEB-INF
- Modify pom.xml to add the necessary portlet and bridges jars to your dependencies.
- Modify web.xml as required by your container. For Gridsphere we will need to do this by hand but other containers (Jetspeed2, uPortal are two) will do automatically convert your web.xml when you deploy.
Here are the details. First, add the following dependencies to your POM:
<!-- Portlet Dependencies -->
<dependency>
<groupId>javax.portlet</groupId>
<artifactId>portlet-api</artifactId>
<version>1.0</version>
<scope>provided</scope>
</dependency>
<dependency>
<groupId>org.apache.portals.bridges</groupId>
<artifactId>portals-bridges-commons</artifactId>
<version>1.0</version>
</dependency>
<dependency>
<groupId>org.apache.portals.bridges</groupId>
<artifactId>portals-bridges-jsf</artifactId>
<version>1.0</version>
</dependency>
A full example of pom.xml for the portlet is here..
For GridSphere, we need to add the following xml snippet to the web.xml:
<servlet-mapping>
<servlet-name>PortletServlet</servlet-name>
<url-pattern>/jsr/RDAHMM-portlet</url-pattern>
</servlet-mapping>
A full example of the portlet's web.xml (for GridSphere) is here.
Thursday, November 02, 2006
Maven Archetype for JSF
Evan Bollig has some nice notes on a Maven archetype for Java Server Faces webapps:
http://www.gorerle.com/vlab-wiki/index.php?title=JavaServerFaces-Archetype
http://www.gorerle.com/vlab-wiki/index.php?title=JavaServerFaces-Archetype
Wednesday, November 01, 2006
The CGL Blog Master List
This is the master list of Community Grids Lab Student Blogs.
http://ahmetsayar.blogspot.com/index.html
http://smitha-report.blogspot.com/
http://jaliyacgl.blogspot.com/
http://zhigangqi.blogspot.com
http://zaoliu.blogspot.com/
http://galipcgl.blogspot.com/
http://byildizreports.blogspot.com/
http://globalmmcs.blogspot.com/index.html
http://manacar.blogspot.com/
http://zhenhua-guo.blogspot.com/
http://kangseokkim.blogspot.com/
http://jychoi-report-cgl.blogspot.com/index.html
http://yucaroldeng.blogspot.com
http://poojamalpani.blogspot.com/
http://hasancgl.blogspot.com/
http://aurelcami.blogspot.com/
http://yiligong.blogspot.com/
http://alikaplanpr.blogspot.com/
http://fatihcgl.blogspot.com/
http://aetopcu.blogspot.com/
Tuesday, October 31, 2006
Testing Google News Feed
Just realized I could add these blog entries to my personalized google page. This test post is to update the feed.
Monday, October 16, 2006
File Upload Limits on Media Wiki
Some sainted internet soul posted the solution for increasing file uploads on MediaWiki when using Apache 2. See the article here: http://meta.wikimedia.org/wiki/Uploading_files
Normally you must edit php.ini, but this file is not read for some reason by Apache HTTPD 2. Instead, you have to set the php parameters directly in httpd.conf, like so:
#Add these for php file limits
php_value upload_max_filesize "10M"
php_value post_max_size "10M"
php_value memory_limit "10M"
php_value file_uploads "On"
I put them directly below the line
LoadModule php4_module modules/libphp4.so
Thank you, thank you, however you are.
Saturday, September 30, 2006
Removing multiple hyperlinks from MS Word; DBLP
Here's a nice keyboard shortcut for Windows: if you need to remove multiple hyperlinks from a word document, highlight the infected area and use cntrl-shift-f9. This is easier than the tedious procedure of right-mouse-clicking and selecting "remove hyperlink" for each link.
I find this useful because I often cut and paste references from DBLP into articles' citation lists. Google "DBLP Geoffrey Fox" or similar to see an example. Very useful but full of hyperlinks.
I find this useful because I often cut and paste references from DBLP into articles' citation lists. Google "DBLP Geoffrey Fox" or similar to see an example. Very useful but full of hyperlinks.
Tuesday, September 19, 2006
Mac Window Captures
I always forget this, so here it is: to capture a section of the Mac display, use apple+shift+4, where "apple" is the Apple command key. Drag the cursor and release to take your shot. It will be saved as a PNG file.
Got this from http://www-rohan.sdsu.edu/~scc/web/screencapt.html
Got this from http://www-rohan.sdsu.edu/~scc/web/screencapt.html
Monday, September 18, 2006
Submitting Globus job through Condor SOAP API
(1) Download and install condor 6.8 from http://www.cs.wisc.edu/condor/
(2) Setup condor for SOAP by adding following lines in etc/condor_config file
WEB_ROOT_DIR=$(RELEASE_DIR)/web
ENABLE_SOAP = TRUE
ALLOW_SOAP = */*
ENABLE_WEB_SERVER = TRUE
QUEUE_ALL_USERS_TRUSTED = TRUE
(3) All condor's WSDL files are located under condor_installation_directory/lib/webservices. Now generate condor client library by using following commnads
java org.apache.axis.wsdl.WSDL2Java condorSchedd.wsdl and
java org.apache.axis.wsdl.WSDL2Java condorCollector.wsdl
Do not forget to include axis jar files into classpath for running above commands. Execution of this commands will generate condor folder under lib/webservices folder.
(4)Now compile all the classes generated under lib/webservices/condor folder by using follwoing command
javac condor/*.java
(5) Make birdbath1.jar file from lib/webservices/condor folder
(6)Also download birdbath.jar file from http://www.cs.wisc.edu/condor/birdbath/birdbath.jar.
(7) include birdbath.jar and birdbath1.jar file to classpath. My classpath looks like following
:/usr/local/axis/axis-1_4/lib/axis-ant.jar:/usr/local/axis/axis-1_4/lib/axis.jar:
/usr/local/axis/axis-1_4/lib/commons-discovery-0.2.jar:/usr/local/axis/axis-1_4/lib/commons-logging-1.0.4.jar:
/usr/local/axis/axis-1_4/lib/jaxrpc.jar:/usr/local/axis/axis-1_4/lib/log4j-1.2.8.jar:
/usr/local/axis/axis-1_4/lib/saaj.jar:/usr/local/axis/axis-1_4/lib/wsdl4j-1.5.1.jar:
/home/condor/condor/lib/webservice/birdbath1.jar:/home/condor/condor/lib/webservice/birdbath.jar:
(8)Now I have created following class SubmitExample3.java to submit globus job
import condor.ClassAdStructAttr;
import condor.ClassAdAttrType;
import condor.UniverseType;
import birdbath.*;
import java.rmi.*;
import java.io.*;
import java.net.*;
import javax.xml.rpc.*;
class SubmitExample3
{
public static void main(String[] arguments)
throws RemoteException, ServiceException, MalformedURLException, IOException
{
Schedd schedd = new Schedd(new URL(arguments[0]));
Transaction xact = schedd.createTransaction();
xact.begin(30);
int cluster = xact.createCluster();
int job = xact.createJob(cluster);
ClassAdStructAttr[] extraAttributes =
{
new ClassAdStructAttr("Out", ClassAdAttrType.value3,"/home/condor/temp.out"),
new ClassAdStructAttr("GridResource", ClassAdAttrType.value3,"gt2 login-co.ncsa.teragrid.org/jobmanager"),
new ClassAdStructAttr("x509userproxy", ClassAdAttrType.value3,"/tmp/x509up_u501")};
xact.submit(cluster, job,"condor",UniverseType.GLOBUS,"/home/condor/test.sh",null,"(TRUE)",extraAttributes,null);
xact.commit();
}
}
This example runs test.sh file located under /home/condor directory using globus universe at ncsa teragrid. It is necessary to specify GridResource and x509userproxy attributes to run globus job.
My test.sh file is simple
#!/bin/sh
echo $HOSTNAME
After execution of test.sh the output will generate under /home/condor/temp.out file
(9) Now compile this class using
javac SubmitExample3.java
(10) To run this example You need to specify Condor's schedd URL as an argument like this
java SubmitExample3 http://Schedd's IP Address:Schedd's Port Number
(11) you can check the status of job using condor_q command like this
condor_q
-- Submitter: 156-56-104-135.dhcp-bl.indiana.edu : <156.56.104.135:32773> : 156-56-104-135.dhcp-bl.indiana.edu
ID OWNER SUBMITTED RUN_TIME ST PRI SIZE CMD
67.0 condor 9/18 10:02 0+00:00:00 I 0 9.8 test.sh
1 jobs; 1 idle, 0 running, 0 held
condor_q
-- Submitter: 156-56-104-135.dhcp-bl.indiana.edu : <156.56.104.135:32773> : 156-56-104-135.dhcp-bl.indiana.edu
ID OWNER SUBMITTED RUN_TIME ST PRI SIZE CMD
67.0 condor 9/18 10:06 0+00:00:13 R 0 9.8 test.sh
1 jobs; 0 idle, 1 running, 0 held
condor_q
-- Submitter: 156-56-104-135.dhcp-bl.indiana.edu : <156.56.104.135:32773> : 156-56-104-135.dhcp-bl.indiana.edu
ID OWNER SUBMITTED RUN_TIME ST PRI SIZE CMD
67.0 condor 9/18 10:06 0+00:02:53 C 0 9.8 test.sh
0 jobs; 0 idle, 0 running, 0 held
(12) After execution result will be displayed in temp.out file
co-login1.ncsa.uiuc.edu
Monday, August 28, 2006
Manually Installing GridSphere Portlets
By popular demand, here is the way to do this the hard way. It works for GridSphere 2.0 and 2.1.
The basic steps to deploying a portlet in GridSphere by hand are the
following (which can also be a check list if things go wrong):
-1. Shutdown tomcat.
0. Edit Tomcat's conf/tomcat-users.xml file and add the line
< user username="gridsphere" password="gridsphere" roles="manager"/>
1. Make sure you have a portlet.xml file.
2. Modify your web.xml file to use GridSphere specific settings. The
Ant task should do this for you.
3. Make sure you have the file gridsphere-portlet.xml in your portlet's
WEB-INF directory. You never need to actually edit this, so you can
copy from one portlet to another.
4. Make sure you have gridsphere-ui-tags.jar in your portlet's
WEB-INF/lib directory.
5. Compile everything and create a war file. Your war file name is
important--it needs to match stuff in web.xml.
6. Copy this war file to tomcat's webapps directory.
7. Create an empty file (using unix's "touch" command) in tomcat's
webapps/gridsphere/WEB-INF/CustomPortal/portlets directory. This should
have the same name as your war file. If your portlet is myjunk.war,
then "touch /path/to/tomcat/webapps/WEB-INF/CustomPortal/portlets/myjunk".
8. Restart tomcat.
Friday, August 25, 2006
SVN and SourceForge
My notes on using the command line SVN with SourceForge are here:
http://www.chembiogrid.org/wiki/index.php/SourceForge_SVN_Repository_Information.
My Mac SVN was not built with SSL support originally. Note of course you need to do "sudo make install" instead of just "make install" for the mac. Or just "sudo -H -u /bin/bash" and have at it.
http://www.chembiogrid.org/wiki/index.php/SourceForge_SVN_Repository_Information.
My Mac SVN was not built with SSL support originally. Note of course you need to do "sudo make install" instead of just "make install" for the mac. Or just "sudo -H -u /bin/bash" and have at it.
Tuesday, August 15, 2006
MacBook Right Click
I always forget this, so I'm blogging it here for posterity: use the ctrl+click to simulate a right mouse button click on your macbook trackpad.
Thursday, August 10, 2006
About Condor
Step 1: Condor Installation
Follow the simple steps available on following website:
http://docs.optena.com/display/CONDOR/A+Simple+Linux+Installation.
I installed condor6.7.19 by using this instructions on single linux machine as a central manager.
Step 2: After installing condor, set the following environment variables
export CONDOR_CONFIG=/home/condor_user/condor_installation_directory/etc/condor_config
export PATH=$PATH:/home/condor_user/condor_installation_directory/bin
export PATH=$PATH:/home/condor_user/condor_installation_directory/sbin
Step 3: Start the condor deamon by using command '/home/condor_user/condor_installation_directory/sbin/condor_master'
Step 4: Check the available machines by using command 'condor_status'
It will display all the machines added with the central manager. In my case it will display simple linux machine details working as a central manager.
Step 5: For configuration of Condor-G follow the instructions from the following link
http://www.cs.wisc.edu/condor/manual/v6.4/5_3Condor_G.html#SECTION00632000000000000000
We have installed NMI-9 which comes with Globus toolkit. Also you need to change configuartion file located at /home/condor_user/condor_installation_directory/etc/condor_config file.
Add or modify following entries in condor_config file
GRIDMANAGER = $(SBIN)/condor_gridmanager
GT2_GAHP = $(SBIN)/gahp_server
GRID_MONITOR = $(SBIN)/grid_monitor.sh
MAX_GRIDMANAGER_LOG = 1000000
GRIDMANAGER_DEBUG = D_COMMAND
GRIDMANAGER_LOG = /tmp/GridmanagerLog.$(USERNAME)
Finally run condor_reconfigure command for updates
Step 6: To run globus jobs you need to have grid credentials and need to run grid-proxy-init command to create proxy.
Step 7: To submit a globus job to condor-g you should have job description file.
Example1:
executable = test.sh
output = test.out
error = test.error
log = test.log
universe = grid
grid_type = gt2
globusscheduler = gf1.ucs.indiana.edu/job-manager
leave_in_queue = jobstatus == 4
queue
This forks and runs job directly on to gf1.ucs.indiana.edu which is specified by globusscheduler.
To run this job simply run the command 'condor_submit job_description_filename'. You can check the status of job by running command 'condor_q or condor_q -analyze job_cluster_number'. You can remove the job by using command 'condor_rm job_cluster_number'
Step 8: using classad
you can advertise classad of any machine to the central manager.
Example: simple class ad for gf1.ucs.indiana.edu machine
MyType = "Machine"
TargetType = "Job"
Name = "condorTest02"
Machine = "condorTest02"
gatekeeper_url = "gf1.ucs.indiana.edu/jobmanager"
UpdatesSequenced = 9
CurMatches = 0
Requirements = TARGET.JobUniverse == 9
Rank = 0.000000
CurrentRank = 0.000000
OpSys = "LINUX"
Arch = "INTEL"
State = "Unclaimed"
Activity = "Idle"
LoadAvg = 0.000000
Memory = 2048
WantAdRevaluate = True
StartdIpAddr = "156.56.104.135"
you can advertise this classad by using following command
condor_advertise -debug -pool pool_name UPDATE_STARTD_AD classad_name and can check the status of that machine by using command condor_status
Example of job submission file for classad use
universe = grid
grid_type = gt2
notification = never
globusscheduler = $$(gatekeeper_url)
executable = test.sh
transfer_executable = true
output = hg-host.$(Cluster).out
error = hg-host.$(Cluster).error
log = hg-host.$(Cluster).log
requirements = TARGET.gatekeeper_url =!= UNDEFINED
queue
submit this job using condor_submit command. Similarly you can create classads for teragrid machines like NCSA and SDSC
Example classad for NCSA:
MyType = "Machine"
TargetType = "Job"
Name = "condorTest05"
Machine = "condorTest05"
gatekeeper_url = "login-co.ncsa.teragrid.org/jobmanager"
UpdatesSequenced = 9
CurMatches = 0
Requirements = TARGET.JobUniverse == 9
Rank = 0.000000
CurrentRank = 0.000000
OpSys = "LINUX"
Arch = "INTEL"
State = "Unclaimed"
Activity = "Idle"
LoadAvg = 0.000000
Memory = 2048
WantAdRevaluate = True
StartdIpAddr = "156.56.104.135"
Example classad for SDSC:
MyType = "Machine"
TargetType = "Job"
Name = "condorTest03"
Machine = "condorTest03"
gatekeeper_url = "tg-login.sdsc.teragrid.org/jobmanager"
UpdatesSequenced = 9
CurMatches = 0
Requirements = TARGET.JobUniverse == 9
Rank = 0.000000
CurrentRank = 0.000000
OpSys = "LINUX"
Arch = "INTEL"
State = "Unclaimed"
Activity = "Idle"
LoadAvg = 0.000000
Memory = 2048
WantAdRevaluate = True
StartdIpAddr = "156.56.104.135"
Good documentation about condor-g and classad is available at following link:
http://www-128.ibm.com/developerworks/grid/library/gr-condorg2/
Wednesday, May 24, 2006
Condor, BirdBath, and Java
Notes on getting Condor+BirdBath running are here:
http://www.chembiogrid.org/wiki/index.php/Condor
http://www.chembiogrid.org/wiki/index.php/Condor
Tuesday, May 23, 2006
Vanilla Globus Install
Here's a link to my installation notes on Globus. I didn't waste time on the SimpleCA (we already have one) or GT4 web services.
http://www.gorerle.com/vlab-wiki/index.php?title=Vlab.scs.fsu.edu
http://www.gorerle.com/vlab-wiki/index.php?title=Vlab.scs.fsu.edu
Monday, May 15, 2006
Java Web Start shortens my time on earth
First, for posterity, you can make a JNLP file into a JSP file (for dynamic control) by simply calling your file something.jsp instead of something.jnlp and using the line
<%@ page contentType="application/x-java-jnlp-file"%>
at the very top.
Now, on to the main article.
The problem: I want to use JOGL (some Java API for OpenGL) to make a web start application. This will need some jars to be signed. JOGL's release jars are signed already--by Sun--but you will need to sign any jars you make. This leads to the error
JAR resources in JNLP file are not signed by same certificate
Luckily, Google found a nice discussion here: http://forum.java.sun.com/thread.jspa?threadID=615425&messageID=342149. In short, you can work around the problem by using the tag in your JNLP file. To use the default jogl jars, use simply this:
<resources>
...
<extension name="jogl" href="http://download.java.net/media/jogl/builds/archive/jsr-231-webstart-current/jogl.jnlp"/>
</resources>
The downside is of course you are now a slave to the JOGL archives. If you want to
guarantee the jogl jars used at download are the ones that are compatible with your compilation, you will need to work out your own salvation. First, change the extension URL to your server in your JNLP file:
<resources>
<extension name="jogl-stuff" href="http://your.host.com/your-app/jogl-stuff.jnlp"/>
</resources>
Then create your extension JNLP. The easiest way to do this is to cheat: use the wget command (on linux/unix) to grab the "official" JOGL JNLP and then edit it.
[shell-prompt> wget http://download.java.net/media/jogl/builds/archive/jsr-231-webstart-current/jogl.jnlp
After editing, your jogl-stuff.jnlp file will look something like
<?xml version="1.0" encoding="utf-8"?>
<jnlp codebase="http://your.server.com/your-app" href="jogl-stuff.jnlp">
<information>
<title>JOGL</title>
<vendor>Sun Microsystems, Inc.</vendor>
<homepage href="http://jogl.dev.java.net/"/>
<description>JOGL - JSR-231 Current Build</description>
<description kind="short">Java programming language binding for the OpenGL 3D graphics API. (Current build of JSR-231 APIs)</description>
<offline-allowed/>
</information>
<security>
<all-permissions/>
</security>
<resources>
<jar href="jogl.jar" />
</resources>
<resources os="Windows" arch="x86">
<nativelib href = "jogl-natives-win32.jar" />
</resources>
<resources os="SunOS" arch="sparc">
<nativelib href = "jogl-natives-solsparc.jar" />
</resources>
<resources os="SunOS" arch="x86">
<nativelib href = "jogl-natives-solx86.jar" />
</resources>
<resources os="Linux" arch="i386">
<nativelib href = "jogl-natives-linux.jar" />
</resources>
<resources os="Linux" arch="x86">
<nativelib href = "jogl-natives-linux.jar" />
</resources>
<resources os="Mac OS X" arch="i386">
<nativelib href = "jogl-natives-macosx.jar" />
</resources>
<component-desc />
</jnlp>
<%@ page contentType="application/x-java-jnlp-file"%>
at the very top.
Now, on to the main article.
The problem: I want to use JOGL (some Java API for OpenGL) to make a web start application. This will need some jars to be signed. JOGL's release jars are signed already--by Sun--but you will need to sign any jars you make. This leads to the error
JAR resources in JNLP file are not signed by same certificate
Luckily, Google found a nice discussion here: http://forum.java.sun.com/thread.jspa?threadID=615425&messageID=342149. In short, you can work around the problem by using the
<resources>
...
<extension name="jogl" href="http://download.java.net/media/jogl/builds/archive/jsr-231-webstart-current/jogl.jnlp"/>
</resources>
The downside is of course you are now a slave to the JOGL archives. If you want to
guarantee the jogl jars used at download are the ones that are compatible with your compilation, you will need to work out your own salvation. First, change the extension URL to your server in your JNLP file:
<resources>
<extension name="jogl-stuff" href="http://your.host.com/your-app/jogl-stuff.jnlp"/>
</resources>
Then create your extension JNLP. The easiest way to do this is to cheat: use the wget command (on linux/unix) to grab the "official" JOGL JNLP and then edit it.
[shell-prompt> wget http://download.java.net/media/jogl/builds/archive/jsr-231-webstart-current/jogl.jnlp
After editing, your jogl-stuff.jnlp file will look something like
<?xml version="1.0" encoding="utf-8"?>
<jnlp codebase="http://your.server.com/your-app" href="jogl-stuff.jnlp">
<information>
<title>JOGL</title>
<vendor>Sun Microsystems, Inc.</vendor>
<homepage href="http://jogl.dev.java.net/"/>
<description>JOGL - JSR-231 Current Build</description>
<description kind="short">Java programming language binding for the OpenGL 3D graphics API. (Current build of JSR-231 APIs)</description>
<offline-allowed/>
</information>
<security>
<all-permissions/>
</security>
<resources>
<jar href="jogl.jar" />
</resources>
<resources os="Windows" arch="x86">
<nativelib href = "jogl-natives-win32.jar" />
</resources>
<resources os="SunOS" arch="sparc">
<nativelib href = "jogl-natives-solsparc.jar" />
</resources>
<resources os="SunOS" arch="x86">
<nativelib href = "jogl-natives-solx86.jar" />
</resources>
<resources os="Linux" arch="i386">
<nativelib href = "jogl-natives-linux.jar" />
</resources>
<resources os="Linux" arch="x86">
<nativelib href = "jogl-natives-linux.jar" />
</resources>
<resources os="Mac OS X" arch="i386">
<nativelib href = "jogl-natives-macosx.jar" />
</resources>
<component-desc />
</jnlp>
Friday, May 12, 2006
A Little Media Wiki FAQ
This page contains useful Media Wiki tips so that I don't have to look them up again.
- How do I edit the sidebar to (for example) add and remove links?
See http://meta.wikimedia.org/wiki/MediaWiki_FAQ#How_do_I_change_the_contents_of_the_navigation_toolbar.3F. You have to be a wiki system admin to do this, so create a sysadmin account you can remember. - How do I add a new link? First create an account. Then edit any page and click the "Internal Link" icon on the editor. This creates an empty link. Save the page, click the empty link, and edit it to add your content.
- How do I enable uploads? See http://www.mediawiki.org/wiki/Configuring_file_uploads.
- Is there a guideline for wiki formatting? See http://meta.wikimedia.org/wiki/Help:Editing.
- Can't I just use HTML? Yes, usually. But the wiki formatting tricks are addictive.
- How can I easily format a long XML file listing? Use the <pre></pre> tags.
Friday, April 28, 2006
Installing a Second MySQL
* I needed to set up several different instances of MySQL on the same Linux hosts--we needed completely separate DBMS for two separate projects.
* The following tricks were gleaned from various Google searches. Through Google, all things are possible. I have attributed helpful sites here and there but not everywhere. http://www.analysisandsolutions.com/code/mybasic.htm
was useful.
* The first DB was installed in /usr/local/mysql in the usual way.
* For the second installation, I first created a new user, "mysql_two". Put the mysql binary under this directory but don't install it yet.
* I then added entries to the /etc/sudoers file for each user who needed access to this second DB. This looks like this:
[shell-prompt> more /etc/sudoers
...
# User privilege specification
root ALL=(ALL) ALL
joeuser ALL=(mysql_two) ALL
moeuser ALL=(mysql_two) ALL
* This allows joeuser and moeuser to run all commands as mysql_two through the sudo command. For example,
[joeuser@gomoejoe> sudo -H -u mysql_two /bin/bash
allows joeuser to login as user mysql_two using the joeuser password. For multiple users, this is convenient since you don't need to share passwords. You can also be more conservative and grant permission to run only specific commands.
* The -H option in sudo sets the $HOME to mysql_two and will source /home/mysql_two/.bashrc, which willbe useful in a minute.
* Now the next problem is that you already have MySQL installed, so you need to specify different data directories, port numbers and so forth for installation #2. All of these are defined in /etc/my.cnf by default (cat this to see).
* To override these /etc/my.cnf settings for mysql_two, I used the $MYSQL_HOME environment variable. See
http://dev.mysql.com/doc/refman/5.0/en/option-files.html. I added this env variable to the /home/mysql_two/.bashrc file:
export MYSQL_HOME=$HOME
* Catting $MYSQL_HOME/my.cnf gives
-----------------------------------------
[mysqld]
datadir=/usr/loocal/mysql_two/data
socket=/usr/local/mysql_two/mysql.sock
[mysql.server]
user=mysql_two
basedir=/usr/local/mysql_two
[safe_mysqld]
err-log=/usr/local/mysql_two/mysqld.log
pid-file=/usr/local/mysql_two/mysqld.pid
port=44070
-----------------------------------------
* Note there is a problem with this file, so keep reading.
* You can now install mysql_two. You need to vary the usual MySQL INSTALL_BINARY instructions a bit. Do the following:
[root@gomoejoe root]# mkdir /usr/local/mysql_two
[root@gomoejoe root]# chown -R mysql_two:mysql_two /usr/local/mysql_two/
[root@gomoejoe root]# su - mysql_two
[mysql_two@gomoejoe mysql_two]$ cd mysql
[mysql_two@gomoejoe mysql]$ ./scripts/mysql_install_db
Note these directories correspond to your $HOME/my.cnf settings. I put this in /usr/local so that I could run multiple mysqls on several machines with NFS mounted files. You can simplify this by just using /home/mysql_two if you are not using NFS.
* Now verify your installation with "$HOME/mysql/bin/mysqladmin -version" from the mysql_two account. You will get the following error:
[mysql_two@gomoejoe mysql]$ ./bin/mysqladmin version
./bin/mysqladmin: connect to server at 'localhost' failed
error: 'Can't connect to local MySQL server through socket '/tmp/mysql.sock' (2)'
Check that mysqld is running and that the socket: '/tmp/mysql.sock' exists!
* http://www.tech-recipes.com/mysql_tips762.html
had the answer. With Google and a firm place to type, I can move the Internet. I added the [client] line to $HOME/my.cnf, so it now looks like this:
[mysql_two@gridfarm005 mysql]$ more /home/mysql_two/my.cnf
[mysqld]
datadir=/usr/local/mysql_two/data
socket=/usr/local/mysql_two/mysql.sock
[mysql.server]
user=mysql_two
basedir=/usr/local/mysql_two
[client]
socket=/usr/local/mysql_two/mysql.sock
port=44070
[safe_mysqld]
err-log=/usr/local/mysql_two/mysqld.log
pid-file=/usr/local/mysql_two/mysqld.pid
port=44070
* mysqladmin -version now works.
Tuesday, April 18, 2006
Some Apache Axis Notes
* Here are some of my notes while debugging an Axis service. I'm
editing them a bit to make them more general. Hopefully these
will be useful if you are looking for a quick guide.
* I realize you can do all of this with Maven or Ant, but
sometimes you just have to roll up your sleeves and do stuff
on the command line.
* Get a clean tomcat and install axis. I'm using Axis 1.3 for
historical reasons.
* You will need to get activation.jar to make axis happy.
* I'm also using Tomcat 5.5.12 and Java 1.5.
* I separated client and server code into separate directories. Here is the
file listing.
------------------------------------------------------
[gateway@gridfarm002 ws_GenericScript]$ ls -l
total 32
drwxr-xr-x 2 gateway gateway 4096 Apr 17 23:02 bin
drwxrwxr-x 3 gateway gateway 4096 Apr 18 11:03 client
-rw-r--r-- 1 gateway gateway 1765 Apr 18 11:01 deploy.wsdd
drwxrwxr-x 2 gateway gateway 4096 Apr 18 11:00 Junk
-rw-r--r-- 1 gateway gateway 169 Apr 17 22:59 README
drwxrwxr-x 3 gateway gateway 4096 Apr 18 11:05 server
-rw-r--r-- 1 gateway gateway 676 Apr 18 11:01 undeploy.wsdd
-rw-r--r-- 1 gateway gateway 2629 Apr 17 23:03 ws_generator.jar
[gateway@gridfarm002 ws_GenericScript]$
[gateway@gridfarm002 ws_GenericScript]$ pwd
/home/gateway/SoapStringWeirdness/ws_GenericScript
[gateway@gridfarm002 ws_GenericScript]$ ls -l server/genericScript/
total 12
-rw-r--r-- 1 gateway gateway 5088 Apr 17 21:40 GenericScriptImpl.java
-rw-r--r-- 1 gateway gateway 125 Apr 17 14:36 GenericScript.java
[gateway@gridfarm002 ws_GenericScript]$
[gateway@gridfarm002 ws_GenericScript]$ ls -l client/genericScript/client/
total 4
-rw-r--r-- 1 gateway gateway 981 Apr 17 21:37 GenericScriptClient.java
--------------------------------------------------------
* Copied activation.jar and the application specific
ws_generator.jar into axis/WEB-INF/lib
* Set my classpath to include the Axis jars and the ws_generator.jar:
export $TOMCAT_HOME=/path/to/tomcat/
export CP=`echo $TOMCAT_HOME/webapps/axis/WEB-INF/lib/*.jar | tr ' ' ':'
Note I don't use CATALINA_HOME since this will cause problems if set as environment
variable. Also, I use $CP instead of $CLASSAPTH to avoid CLASSPATH problems.
* I decided that the server code (GenericScriptImpl.java), needed some simple sanity
checking methods, so I added these:
public void emptyTest() {
System.out.println(this.toString()+" empty test called");
}
public String echoTest(String toEcho) {
System.out.println(this.toString()+" echo test called");
return toEcho;
}
* Compile the server code into axis. Make sure the classes directory exists.
javac -d $TOMCAT_HOME/webapps/axis/WEB-INF/classes/ -classpath $CP server/genericScript/*.java
* Start tomcat and deploy the service. I'm using the following simplified deploy.wsdd:
<deployment name="test" xmlns="http://xml.apache.org/axis/wsdd/"
xmlns:java="http://xml.apache.org/axis/wsdd/providers/java"
xmlns:xsd="http://www.w3.org/2000/10/XMLSchema"
xmlns:xsi="http://www.w3.org/2000/10/XMLSchema-instance">
<service name="GenericScript" provider="java:RPC" >
<namespace>http://soapinterop.org/</namespace>
<parameter name="className" value="genericScript.GenericScriptImpl" />
<parameter name="allowedMethods" value="*" />
</service>
</deployment>
* I use the following deploy command:
[gateway@gridfarm002 ws_GenericScript]$ java -classpath $AXIS_LIB org.apache.axis.client.AdminClient -lhttp://gf2.ucs.indiana.edu:8080/axis/services/GenericScript deploy.wsdd
* Pointed browser at the service lister to verify that the service was deployed:
http://gf2.ucs.indiana.edu:8080/axis/servlet/AxisServlet. This is linked from the
main Axis page: http://gf2.ucs.indiana.edu:8080/axis/.
* To undeploy the service, the simplest thing to do is shutdown tomcat, edit server-config.wsdd, and
cut out the service description for the no-longer-desired service. Then restart tomcat and
check the listings.
-------------------------------------------------------------------
* Now we can turn to the client. We need to generate client stubs from the WSDL. I just downloaded
this from the Axis service for simplicity: http://gf2.ucs.indiana.edu:8080/axis/services/GenericScript?wsdl.
Saved this to a file. The UNIX wget method is useful here.
* I then executed the following command in the ws_GenericScript (i.e. main) directory.
java -classpath $CP org.apache.axis.wsdl.WSDL2Java -o ./client -p genericScript.ws GenericScript.wsdl
The -p option specifies the package/directory structure for the generated files and -o specifies
the directory where the stubs are coughed up.
* Now I compile the client and the client stubs. Compile the stubs first and then compile the client.
Here is the command for compiling the client:
javac -d /tmp/ -classpath $CP client/genericScript/ws/*.java
Note I'm putting these in the /tmp/ directory. This is just to keep it separate from the service
code.
* I next compiled the client application that uses the stubs. I used this command:
javac -d /tmp/ -classpath $CP:/tmp/ client/genericScript/client/*.java
* Note the key parts of the client application are these:
String theUrl="http://path/to/service/";
genericScript.ws.GenericScriptImplService eosService=
new genericScript.ws.GenericScriptImplServiceLocator();
genericScript.ws.GenericScriptImpl eos=
eosService.getGenericScript(new URL(theUrl));
Monday, April 03, 2006
Using Maven 2 for Web Service
Following is the Quick Start Guide for using Maven 2 for the Web Service
(1) Download Maven 2 from http://maven.apache.org/download.html by selecting proper file for your machine platform
(2) Unpack the archive, eg: tar zxvf maven-2.0.tar.gz or unzip maven-2.0.zip. A directory called "maven-2.0" will be created.
(3) Add the bin directory to your PATH, eg: export PATH=/usr/local/maven-2.0/bin:$PATH or set PATH="c:\program files\maven-2.0\bin";%PATH%
(4) Make sure JAVA_HOME is set to the location of your JDK
(5) Run "mvn --version" to verify that it is correctly installed
(6) Now create Web application project by running following command
mvn archetype:create -DgroupId=example1 -DartifactId=portlet1 -DarchetypeArtifactId=maven-archetype-webapp
This command will create a new project called "portlet1" specifically for web application
(7) create folder "java" under portlet1/src/main and put all the .java files under this folder
(8) To compile the java file you may need some jar files. you can specify the jar files in pom.xml file located under portlet1 directory. when you specify particular jar file in pom.xml file, during compilation it will search that file first in http://www.ibiblio.org/maven2/(ibiblio repository). If that file is not available in ibiblio repository it will try to find out in local repository.
(9) If you want to specify the jar file required during compilation and available in ibiblio repository, add following lines in pom.xml file
<dependency>
<groupId></groupId>
<artifactId></artifactId>
<version></version>
<scope>compile</scope>
</dependency>
E.g If you want to specify "antlr2.7.1.jar" file in pom.xml then follow this link of ibiblio repository http://www.ibiblio.org/maven2/antlr/antlr/2.7.1/antlr-2.7.1.pom and copy following three tags from .pom file under dependency tag.
<groupId>antlr</groupId>
<artifactId>antlr</artifactId>
<version>2.7.1</version>
(10) Another possibility is, if your required jar file is not available under ibiblio repository.you can either copy that jar file into local repository or can
create remote repository. To copy the jar file into local repository you can use following command at local repository directory(~/.m2/repository in unix).
E.g. mvn install:install-file -Dfile= jar file location -DgroupId= -DartifactId= -Dversion= -Dpackaging= jar
(11) you can create a remote repository by installing all the required jar files by using above mentioned command directly to server's/webapps(E.g tomcat server/webapps/CICC) folder and can access it via URL.
E.g http://gf8.ucs.indiana.edu:9080/CICC
(12)when you are going to use jar files from remote repository you have to mention it in pom.xml file like this
<repositories>
<repository>
<id>central</id>
<name>Maven Repository Switchboard</name>
<layout>default</layout>
<url>http://www.ibiblio.org/maven2</url>
<snapshots>
<enabled>false</enabled>
</snapshots>
</repository>
<repository>
<id>central</id>
<name>Maven Repository Switchboard</name>
<layout>default</layout>
<url>http://gf8.ucs.indiana.edu:9080/CICC</url>
<snapshots>
<enabled>false</enabled>
</snapshots>
</repository>
</repositories>
(13) When you have all the required jar files for compilation of java files then you can compile all the java files by using "mvn compile" command
(14) To create war file for this project run "mvn install" command
(15) Put war file under server's/webapps folder and restart the server
(16) To make a web service you must have all the other required files from axis folder. Copy all the required files example server-config.wsdd etc from axis folder. Restart the server. Deploy web service by command java org.apache.axis.client.Adminclient deploy.wsdd
for more details follow Axis tutorial on how to deploy a web service.
(17) restart the server. and you will be able to see the deployed web service
Thursday, March 30, 2006
Friday, March 24, 2006
Close Encounters with TeraGrid
I posted some notes on getting Grid credentials set up on the TeraGrid here:
http://www.gorerle.com/vlab-wiki/index.php?title=Using_TeraGrid on the VLAB wiki.
After I complained, Eric Roberts (TeraGrid user portal developer) sent me these notes: TG Portal Notes
I've also expanded the notes considerably, with some additional notes on installing the Espresso codes (or failures of such) and invoking them via Globus.
Thursday, March 16, 2006
Jetspeed 2 Notes: Getting Started
-------------------------------------
Jetspeed 2 Notes
-------------------------------------
* I'm doing this on my MacBook, by the way.
* Grabbed the "Derby" version of Jetspeed 2 to avoid installing a database. The installation was clean, just used notes from
http://portals.apache.org/jetspeed-2/getting-started-installer.html.
* I note the Jetspeed2 pages are a little confusing, so it is not completely clear how to do a quick start. The link above is the one to use.
* Noted that I did need to set JAVA_HOME for Tomcat to work, so I did. /usr/bin/java is a link that points to /System/Library/Frameworks/JavaVM.framework/Commands/java. Looking around a bit, I see that there is also /System/Library/Frameworks/JavaVM.framework/Home. This is the one. Edit ~/.bashrc and add "export JAVA_HOME=System/Library/Frameworks/JavaVM.framework/Home". Source it and you should be set.
* Fired up the tomcat server, used "tail -f catalina.out" to get some feel for when things were up and running, and then pointed browser at http://localhost:8080/jetspeed/portal. Success.
* Logged in as admin/admin of course. Was immediately faced with having to reset my password.
Could not do anything until I reset, and could not use the same default value. Damn security. In case you are wondering, my admin password is now "admin2".
-------------------------------------
Adding a portlet the hard way.
-------------------------------------
* OK, now I want to deploy a portlet. I'm going to try the IFrame portlet (of course) from the OGCE2 release. This will be interesting, since I will have to a) figure out the web.xml and b) figure out how to get Jetspeed to recognize it.
* So far, so bad. I made the IFrame portlet. Then took a took at the guidelines here:
http://portals.apache.org/jetspeed-2/guides/guide-simple-portlet.html. So I made sure I used the simplest web.xml possible and remade the war. My web.xml is below.
The jetspeed deployment process will convert this as necessary.
* Make the war with "cd /path/to/iframe-portlet/; jar -cf iframe-portlet.war".
* I then copied the war into webapps/jetspeed/WEB-INF/deploy. Jetspeed magic took over for a while (I followed along in catalina.out). Then pointed browser at http://localhost:8080/jetspeed/portal/iframe-portlet.psml. Of course things didn't work, but the first failure was a little obscure.
* Looking again at the Jetspeed porltet guide, I realized I needed to make a PSML file. So I made one. This is very BAD since it is easy to make mistakes with the PSML creation. Anyway, I made one called iframe-portlet.psml. It looks like this:
I placed this under ~/ApacheJetspeed2.0/webapps/jetspeed/WEB-INF/pages/. I then pointed the browser to http://localhost:8080/jetspeed/portal/iframe-portlet.psml. I of course got an error.
Title Error: Cannot pass a null PortletDefinition to a PortletEntity.
Failed to retrieve Portlet Definition for iframe::IFramePortletFailed to retrieve Portlet Definition for iframe::IFramePortletjava.lang.IllegalArgumentException: Cannot pass a null PortletDefinition to a PortletEntity.Failed to retrieve Portlet Definition for iframe::IFramePortletFailed to retrieve Portlet Definition for iframe::IFramePortlet
* Success! It looks a little crappy, but I found that the error was in my fragment name. Change this:
to this:
The name attribute should have the value "${portlet.war.name}::${portlet.name}. The first part (${portlet.war.name}) is the name of the portlet war file, minus the .war. So I had iframe-portlet.war, so I have to use iframe-portlet. The second part comes from the value of the <portlet-name/> tag in the portlet.xml file.
I hope all of this is obvious.... See http://portals.apache.org/jetspeed-2/multiproject/jetspeed-deploy-tools/.
* You can also add things to default-page.psml or one of the other PSML files if you prefer.
-----------------------------------------------
Adding portlets to a layout.
-----------------------------------------------
* OK, you can always edit PSML stuff by hand, but obviously this is no good for people don't have write permission to the jetspeed directories.
* One way to do this is as follows:
1. Log in
2. In the upper right corner, click the edit ("pencil") icon. If unsure, there is a tooltip popup
over the icon.
3. You should now see three icons in the upper right: View, Help, and Add a Portlet. This is
the + ("plus") icon.
4. Click add a portlet. You should get a popup window.
5. Search for your portlet by name or by keyword (note keywords are in the portlet.xml).
6. Add it.
* Try something like "RSS" and use keyword searching.
* Note also you can do a similar thing to add tabs to the top menu. Enter edit mode first. You should
see a mysterious "Add Page" button next to a text field. Hmm. So type in a name and you will get a new tab across the top.
* Click the tab you just created. It will be filled completely with the lefthand navigator window, which I found confusing at first. Enter Edit mode by clicking the pencil icon in the upper right and then add a portlet as before.
* The main problem with this approach is that you have to know or guess at the available portlets. Hopefully there is a way to do this differently.
* You may also wonder at this point if there is a way to remove these tabs that you are creating. There is a way. Log in as the administrator and click the Portal Site Manager. You will need to click "Jetspeed Administrative Portlets" on the lefthand side. Under the tree view, find the user account that includes all the new tabs that you added. Click the tab to cause it to appear in the right hand column. Click delete.
Jetspeed 2 Notes
-------------------------------------
* I'm doing this on my MacBook, by the way.
* Grabbed the "Derby" version of Jetspeed 2 to avoid installing a database. The installation was clean, just used notes from
http://portals.apache.org/jetspeed-2/getting-started-installer.html.
* I note the Jetspeed2 pages are a little confusing, so it is not completely clear how to do a quick start. The link above is the one to use.
* Noted that I did need to set JAVA_HOME for Tomcat to work, so I did. /usr/bin/java is a link that points to /System/Library/Frameworks/JavaVM.framework/Commands/java. Looking around a bit, I see that there is also /System/Library/Frameworks/JavaVM.framework/Home. This is the one. Edit ~/.bashrc and add "export JAVA_HOME=System/Library/Frameworks/JavaVM.framework/Home". Source it and you should be set.
* Fired up the tomcat server, used "tail -f catalina.out" to get some feel for when things were up and running, and then pointed browser at http://localhost:8080/jetspeed/portal. Success.
* Logged in as admin/admin of course. Was immediately faced with having to reset my password.
Could not do anything until I reset, and could not use the same default value. Damn security. In case you are wondering, my admin password is now "admin2".
-------------------------------------
Adding a portlet the hard way.
-------------------------------------
* OK, now I want to deploy a portlet. I'm going to try the IFrame portlet (of course) from the OGCE2 release. This will be interesting, since I will have to a) figure out the web.xml and b) figure out how to get Jetspeed to recognize it.
* So far, so bad. I made the IFrame portlet. Then took a took at the guidelines here:
http://portals.apache.org/jetspeed-2/guides/guide-simple-portlet.html. So I made sure I used the simplest web.xml possible and remade the war. My web.xml is below.
<?xml version="1.0" encoding="ISO-8859-1"?>
<!DOCTYPE web-app
PUBLIC "-//Sun Microsystems, Inc.//DTD Web Application 2.3//EN"
"http://java.sun.com/dtd/web-app_2_3.dtd">
<web-app>
<display-name>IFrame Portlet</display-name>
<description>
IFrame portlet
</description>
</web-app>
The jetspeed deployment process will convert this as necessary.
* Make the war with "cd /path/to/iframe-portlet/; jar -cf iframe-portlet.war".
* I then copied the war into webapps/jetspeed/WEB-INF/deploy. Jetspeed magic took over for a while (I followed along in catalina.out). Then pointed browser at http://localhost:8080/jetspeed/portal/iframe-portlet.psml. Of course things didn't work, but the first failure was a little obscure.
* Looking again at the Jetspeed porltet guide, I realized I needed to make a PSML file. So I made one. This is very BAD since it is easy to make mistakes with the PSML creation. Anyway, I made one called iframe-portlet.psml. It looks like this:
<page>
<defaults
skin="orange"
layout-decorator="tigris"
portlet-decorator="tigris"
/>
<title>The Glorious IFrame Portlet</title>
<metadata name="title" xml:lang="en">Junk</metadata>
<fragment id="iframe" type="layout" name="jetspeed-layouts::VelocityOneColumn">
<fragment id="iframe-1" type="portlet" name="iframe::IFramePortlet">
<property layout="TwoColumns" name="row" value="0" />
<property layout="TwoColumns" name="column" value="1" />
</fragment>
</fragment>
<security-constraints>
<security-constraints-ref>public-view</security-constraints-ref>
</security-constraints>
</page>
I placed this under ~/ApacheJetspeed2.0/webapps/jetspeed/WEB-INF/pages/. I then pointed the browser to http://localhost:8080/jetspeed/portal/iframe-portlet.psml. I of course got an error.
Title Error: Cannot pass a null PortletDefinition to a PortletEntity.
Failed to retrieve Portlet Definition for iframe::IFramePortletFailed to retrieve Portlet Definition for iframe::IFramePortletjava.lang.IllegalArgumentException: Cannot pass a null PortletDefinition to a PortletEntity.Failed to retrieve Portlet Definition for iframe::IFramePortletFailed to retrieve Portlet Definition for iframe::IFramePortlet
* Success! It looks a little crappy, but I found that the error was in my fragment name. Change this:
<fragment id="iframe-1" type="portlet" name="iframe::IFramePortlet">
to this:
<fragment id="iframe-1" type="portlet" name="iframe-portlet::IFramePortlet">
The name attribute should have the value "${portlet.war.name}::${portlet.name}. The first part (${portlet.war.name}) is the name of the portlet war file, minus the .war. So I had iframe-portlet.war, so I have to use iframe-portlet. The second part comes from the value of the <portlet-name/> tag in the portlet.xml file.
I hope all of this is obvious.... See http://portals.apache.org/jetspeed-2/multiproject/jetspeed-deploy-tools/.
* You can also add things to default-page.psml or one of the other PSML files if you prefer.
-----------------------------------------------
Adding portlets to a layout.
-----------------------------------------------
* OK, you can always edit PSML stuff by hand, but obviously this is no good for people don't have write permission to the jetspeed directories.
* One way to do this is as follows:
1. Log in
2. In the upper right corner, click the edit ("pencil") icon. If unsure, there is a tooltip popup
over the icon.
3. You should now see three icons in the upper right: View, Help, and Add a Portlet. This is
the + ("plus") icon.
4. Click add a portlet. You should get a popup window.
5. Search for your portlet by name or by keyword (note keywords are in the portlet.xml).
6. Add it.
* Try something like "RSS" and use keyword searching.
* Note also you can do a similar thing to add tabs to the top menu. Enter edit mode first. You should
see a mysterious "Add Page" button next to a text field. Hmm. So type in a name and you will get a new tab across the top.
* Click the tab you just created. It will be filled completely with the lefthand navigator window, which I found confusing at first. Enter Edit mode by clicking the pencil icon in the upper right and then add a portlet as before.
* The main problem with this approach is that you have to know or guess at the available portlets. Hopefully there is a way to do this differently.
* You may also wonder at this point if there is a way to remove these tabs that you are creating. There is a way. Log in as the administrator and click the Portal Site Manager. You will need to click "Jetspeed Administrative Portlets" on the lefthand side. Under the tree view, find the user account that includes all the new tabs that you added. Click the tab to cause it to appear in the right hand column. Click delete.
Tuesday, March 07, 2006
Maven 2 Web Site and Unit Report Generation
* I was interesting in both the Xdoc and JUnit dashboard capabilities of Maven 2 (and how they compared
to Maven 1).
* To start, Maven 2 has a nice built in archetype that you can use to create an entire site. From the
Maven 2 User Guide, you use the following piece of command line magic:
mvn archetype:create -DgroupId=com.mycompany.app -DartifactId=my-app -DarchetypeGroupId=org.apache.maven.archetypes -DarchetypeArtifactId=maven-archetype-site
* Unfortunately this didn't work. It is supposed to create a project called my-app with directories
site, test, and main under my-app/src, but only site was created. So I used the above archetype
command, then used the default archetype to make normal project in the /tmp directory, and then
cp -r'd the main and test directories.
* I also had to copy the Junit <dependency/> stuff into the pom.xml of the site archetype.
* Next I ran "mvn site" but had to do this twice for some reason to get a successful build. The
token site was built in my-app/target/site.
* OK, now I run the tests. Looking around, I finally found the target that actually creates the
html dashboard reports for your test. It is
mvn surefire-report:report
The resulting report summary of your tests will be placed in target/site/surefire-report.html
* But note however that "mvn site" and "mvn surefire-report:report", while they both make HTML files
under the target/site directory, will not be combined in the same XDoc generated page.
* So how do you make extra stuff show up in the generated site? All of the web page configuration
is contained in my-app/src/site/site.xml. Open this and edit. Add the <item> to the <menu> section.
<?xml version="1.0" encoding="ISO-8859-1"?>
<project name="Maven">
<bannerLeft>
<name>Maven</name>
<src>http://maven.apache.org/images/apache-maven-project.png</src>
<href>http://maven.apache.org/</href>
</bannerLeft>
<bannerRight>
<src>http://maven.apache.org/images/maven-small.gif</src>
</bannerRight>
<body>
<links>
<item name="Apache" href="http://www.apache.org/" />
<item name="Maven 1.0" href="http://maven.apache.org/"/>
<item name="Maven 2" href="http://maven.apache.org/maven2/"/>
</links>
<menu name="Maven 2.0">
<item name="APT Format" href="format.html"/>
<item name="FAQ" href="faq.html"/>
<item name="Xdoc Example" href="xdoc.html"/>
<!-- Added this item here -->
<item name="Unit Reports" href="surefire-report.html"/>
</menu>
${reports}
</body>
</project>
* Also note that the ${reports} will add all the usual maven "Project Info" links on the left hand
side bar.
* Maven's pom also has a <reporting> section. Looks like this:
<project>
...
<reporting>
<plugins>
<plugin>
<groupId>org.apache.maven.plugins</groupId>
<artifactId>maven-project-info-reports-plugin</artifactId>
</plugin>
</plugins>
</reporting>
...
</project>
This tag is at the same level as <dependencies>, <build>, etc.
* I ran this, by the way, with "mvn clean surefire-report:report site" to clean, make the surefire
report, and then make the site.
Wednesday, February 22, 2006
Using WSS4J with Axis
The material below is from the Apache axis site and another web site with the examples modified and in greater detail.
The example elaborated below is to secure the StockQuoteService that comes with the Axis samples.(AXIS_HOME\samples\stock).
Prerequisite :
1)Configure Axis on Tomcat
2)Download wss4j and add the jar in the class path
<a href="http://www.apache.org/dyn/closer.cgi/ws/wss4j/">http://www.apache.org/dyn/closer.cgi/ws/wss4j/</a>
3)Make sure that all the required axis jar files are in the class path.Also the jar file opensaml-1.1.jar is required in the class path.
The steps are outlined below :
1)Create a deployment descriptor (deploy.wsdd) with the below contents.Note that the username token is added.
<deployment xmlns="http://xml.apache.org/axis/wsdd/" java="http://xml.apache.org/axis/wsdd/providers/java"> </deployment>
<service name="stock-wss-01" provider="java:RPC" style="" use="literal"> </service>
<requestflow> </requestflow>
<handler type="java:org.apache.ws.axis.security.WSDoAllReceiver"> </handler>
<parameter name="passwordCallbackClass" value="PWCallback"> </parameter>
<p><parameter name="action" value="UsernameToken"> </parameter>
<parameter name="className" value="samples.stock.StockQuoteService"> </parameter>
<parameter name="allowedMethods" value="getQuote"> </parameter></p><p><parameter name="scope" value="application"> </parameter>
<parameter name="passwordCallbackClass" value="PWCallback">
</parameter>
The WSDoAllReceiver is an Axis handler located in wss4j.jar package. This is the standard way to deploy an Axis handler. For more details please refer to the Axis handler for WSS4J documentation.
2)Deploy the service (using AxisAdmin). java org.apache.axis.client.AdminClient -lhttp://localhost:8080/axis/services/AdminService deploy.wsdd
3)Create a class named PWCallback.java and compile it and put the resulting PWCallback.class file into your Axis WEB-INF/classes directory. (under the appropriate package - samples/stock/client)
The following code snippet shows a simple password callback class:
package samples.stock.client;
import java.io.IOException;
import javax.security.auth.callback.Callback;
import javax.security.auth.callback.CallbackHandler;
import javax.security.auth.callback.UnsupportedCallbackException;
import org.apache.ws.security.WSPasswordCallback;
public class PWCallback implements CallbackHandler {
public void handle(Callback[] callbacks) throws IOException, UnsupportedCallbackException {
for (int i = 0; i < pc =" (WSPasswordCallback)callbacks[i];" href="http://localhost:8080/axis/services/stock-wss-01?wsdl">http://localhost:8080/axis/services/stock-wss-01?wsdl</a>
A bunch of java classes will be created under samples/stock/client, including the StockQuoteServiceServiceLocator.
5)Create a deployment descriptor file (client_deploy.wsdd) for the client: <deployment xmlns="http://xml.apache.org/axis/wsdd/" java="http://xml.apache.org/axis/wsdd/providers/java">
<transport name="http" pivot="java:org.apache.axis.transport.http.HTTPSender">
<requestflow><deployment xmlns="http://xml.apache.org/axis/wsdd/" java="http://xml.apache.org/axis/wsdd/providers/java">
<transport name="http" pivot="java:org.apache.axis.transport.http.HTTPSender">
<globalconfiguration>
<requestflow>
<handler type="java:org.apache.ws.axis.security.WSDoAllSender">
<parameter name="action" value="UsernameToken">
<parameter name="user" value="wss4j">
<parameter name="passwordCallbackClass" value="samples.stock.client.PWCallback">
<parameter name="passwordType" value="PasswordDigest">
</parameter>
</parameter>
</parameter>
</parameter>
<parameter name="passwordCallbackClass" value="samples.stock.client.PWCallback">
</parameter>
6)Write the below client class that invokes the service.
package samples.stock.client;
import java.rmi.RemoteException;
import javax.xml.rpc.ServiceException;
public class StockServiceClient {
public StockServiceClient() {
}
public static void main(String[] args) throws ServiceException, RemoteException {
if (args.length == 0) {
System.out.println("Usage:\njava StockServiceClient [symbol]");
return;
}
StockQuoteServiceService locator = new StockQuoteServiceServiceLocator();
StockQuoteService service = locator.getStockWss01();
float quote = service.getQuote(args[0]);
System.out.println("stock quote service returned " + args[0] + ": " + quote);
}
}
7)Define the system property axis.ClientConfigFile for your client:
java -Daxis.ClientConfigFile=client_deploy.wsdd -classpath $AXISCLASSPATH samples.stock.client.StockServiceClient
Make sure that your CLASSPATH includes the jar files under WEB-INF/lib.
Another way to do this is to specify the wsdd file in your StockServiceClient to the service locator programmatically:
...
import org.apache.axis.EngineConfiguration;
import org.apache.axis.configuration.FileProvider;
...
EngineConfiguration config = new FileProvider("client_deploy.wsdd");
StockQuoteServiceService locator = new StockQuoteServiceServiceLocator(config);
...
8)Run the client, you should get no errors:
java samples.stock.client.StockServiceClient XXX
stock quote service returned XXX: 55.25
Your client is now sending a Username Token in the wsse request header with the username "wss4j" (see client_deploy.wsdd) and password "security" (see the PWCallback implementation).
9)Try modifying your client's PWCallback to return the wrong password, or send the wrong username. The service should reject your requests.</handler></requestflow></globalconfiguration></transport></deployment></requestflow></transport></deployment>
Tuesday, February 14, 2006
Setting up SVN on Apache
SVN + Apache Configuration
* I am following the nice, 300 page downloadable SVN book. Gotta love this.
* You must use Apache 2.0. Luckily, I am.
* First, if you have not done so, create an SVN repository. For example, you use
[shell> svnadmin create /home/subversion/test
[shell> svn import /some/other/directory file:///home/subversion/test
* If necessary, grab and install the mod_dav_svn stuff with yum. First, log in as root. Then
[shell> yum install mod_dav_svn
* But check the version of svn that you get this way. The SVN specific authorization stuff described below
only works with SVN 1.x, but yum (on my old Fedora 1) gave me 0.32.
* If necessary, copy the downloaded .so modules and conf files into your apache directory. However,
I noted that stuff was already in my Apache 2.0 installation.
* Edit httpd.conf to add any modules.
#SVN modules
#LoadModule dav_module modules/mod_dav.so
LoadModule dav_svn_module modules/mod_dav_svn.so
LoadModule authz_svn_module modules/mod_authz_svn.so
* Add some locations. For multiple repos, do something like this:
<Location /svn>
DAV svn
SVNParentPath /home/subversion
</Location>
This will map everything under http://your.host/svn to /home/subversion. For example,
the repository test under /home/subversion/test (as we created above) can be accessed
via http://your.host/svn/test.
* Point your browser at http://localhost/svn/test and you should see your files.
* For even more fun, open http://localhost/svn/test as a web folder (ie using
builtin MS WebDAV clients) or any other DAV client. You may notice it does not
require authentication, but (at least for me) write access is not working.
* HTTP AuthN and AuthZ can be set up to solve this in a coarse way. Start by
making a password.
[shell> htdigest -c /etc/httpd/password/digest "Subversion repository" ogce
See for example the bottom of http://httpd.apache.org/docs/1.3/howto/auth.html (note this still works
for Apache 2.0).
* Next add the following stuff to the <Location/>:
<Location /svn>
DAV svn
SVNParentPath /home/subversion/
AuthType Digest
AuthName "Subversion repository"
AuthDigestFile /etc/httpd/password/digest
<LimitExcept GET PROPFIND OPTIONS REPORT>
Require valid-user
</LimitExcept>
</Location>
* Note that the AuthName must match the realm name used with htdigest.
* The <LimitExcept> business means that if you try to do anything other than a few
read-like operations, you will be prompted for a password.
* I found this to be a bit flaky and unpredictable, but luckily after some false
starts I got Subversion access control to work correctly (ie I upgraded to
version 1.1 of svn and the apache svn mods). My modified httpd.conf file entry
now looks like this:
<Location /svn/>
DAV svn
SVNParentPath /home/subversion/
AuthzSVNAccessFile /etc/httpd/conf/svnserver.conf
AuthType Digest
AuthName "Subversion repository"
AuthDigestFile /etc/httpd/password/digest
Satisfy any
Require valid-user
</Location>
The "Satisfy any" and "Require valid-user" are a little at odds, but this is resolved
with the AuthzSVNAccessFile entries described below. "Satisfy any" simply means
"accept any authentication requirements that we will impose."
* The AuthzSVNAccessFile that you specify to be svnserver.conf has entries such as the following:
[test:/]
* = r
ogce = rw
This means "On the test repository and all of its children, give everyone read access and
give the ogce user both read and write access." Thus when you try to import or commit, you will be
prompted for a username and password.
* The SVN authz file can also provide more fine-grained access. For example, I may want to make
all of the projects EXCEPT one called tomcat-plugin2 world readable and make tomcat-plugin2
accessible only by an authenticated user. I do this with the following contents of svnserver.conf:
[test:/]
* = r
ogce = rw
[test:/tomcat-plugin2]
*=
ogce = rw
Navigating to this tomcat-plugin2 directory will cause a password prompt window to appear. If I
login as the indicated user, I can access the rest of this project.
* Check at this point to make sure all of your svn commands work over http:
svn import http://your.host/svn/test/your_project_dir/
svn list http://your.host/svn/test/your_project_dir
svn checkout http://your.host/svn/test/your_project_dir
svn commit
You should be prompted for a password on the write operations (import, commit) although
svn seems to remember you after the first login. Looks like this is stored in ~/.subversion/auth
* The svn commit command assumes you have made some modifications to your checkout. If so,
you should be prompted for a password before this gets accepted (if you have configured
everything correctly).
Monday, February 13, 2006
Get MyProxy credentials from Globus using COG kit on local client machine
1)Install the latest version of COG Kit on your machine
2)Set up the required keys and properties on your account in the server where globus is installed.For instance : on your account on gf1.ucs.indiana.edu, follow the steps outlined in the below link :
http://grids.ucs.indiana.edu/users/manacar/myproxy/myproxy%20guidelines.htm
For the keys, mail Mehmet (mnacar@indiana.edu)
Note that in the last step , myproxy-init :
The password given in 'GRID pass' is the GF1 password and the password given in 'MyProxy pass' is any password of your choice.This is the password that should be in your program to retreive MyProxy credentials.
myproxy-init
Enter GRID pass phrase for this identity:
Creating proxy .................................................. DoneProxy
Verify OKYour proxy is valid until: Tue Feb 7 15:15:24 2006
Enter MyProxy pass phrase:
Enter MyProxy pass phrase:
3)Client program to get My Proxy details :
- Write a program on your local machine to access gf1 and retreive MyProxy credentials with the following values for the properties.
int port = 7512;
String hostName = "gf1.ucs.indiana.edu";
int lifeTime = 2 * 60 * 60;
MyProxy myproxy = new MyProxy(hostName, port);
GSSCredential proxy = myproxy.get("sajay","test123",lifeTime);
- Testing the above code to retrive the values of MyProxy as below :
GSSCredential proxy = proxyAccessor.getProxy();
System.out.println( proxy.getRemainingLifetime());
System.out.printlnproxy.getName().toString());
Result :
getLifetime() = 0
getName() = /C=US/O=Indiana University/OU=Community Grids Lab/CN=Smitha Ajay
Thursday, February 09, 2006
installation of Axis and Taverna
Tuesday, February 07, 2006
Maven 2 Plugin Goal Quick Notes
My previous Maven plugin examples had only one goal, but mavenites know that plugins
typically have many separate goals. For example, see the
War Plugin Goals.
Each goal correpsonds to a separate piece of Java code. The source is
here
You will notice each Mojo has a separate "@goal" in the top level comments, above the class definition.
Note that all of these classes correspond to the same plugin. Apparently Maven will inspect the contents of the plugin's jar to find the class with the appropriate @go definition and load it.
Monday, February 06, 2006
Maven 2 Notes, Part 6: Multiproject Builds
****************************************************************
Maven 2 Notes, Part 6: Multiproject Builds
****************************************************************
----------------------------------------------------------------
Section 1: Basics for Building Multiple Maven Projects
----------------------------------------------------------------
* Maven 1's multiproject builds were notorioulsy vague and mysterious.
Fortunately Maven 2 seems to have cleaned things up, starting with
the directory structure.
* Now, sensibly, the directory structure is what you would expect:
the multiproject has a parent directory and various child directories.
Presumably the children can have children of their own, but this is
something to test.
* Maven 2's "Getting Started Guide"
http://maven.apache.org/guides/getting-started/index.html
has a pretty good overview, so I'm using this as a starting point. I'll
try to deviate a few places to keep it interesting.
* Multiproject builds are also sensibly related to the inheritance mechanism.
But note that this works even if you run the maven commands in the parent
directory: it will search for all pom.xml files in all of the children.
* To test this out, I created a shell of a real problem: we must in the OGCE
project build a ProxyManager portlet (as a war) that itself depends on several
other jars. We can simulate this by creating the following projects:
o Parent: a shell project with only a pom.xml and no source code.
o Child1: a standard project that creates a jar.
o Child2: a webapp project that creates a war.
Both projects extend the parent and additionally Child2 depends on the jar created
by Child1.
* Set all of this up with Maven's archetype:create tools. Here is my edited UNIX history:
1393 mvn archetype:create -DgroupId=xportlets.multitest -DartifactId=parent
1394 cd parent
1396 mvn archetype:create -DgroupId=xportlets.multitest -DartifactId=child1
1398 mvn archetype:create -DgroupId=xportlets.multitest -DartifactId=child2 -DarchetypeArtifactId=maven-archetype-webapp
Recall that these simple artifact steps create dummy java programs, as we
discussed in an earlier blog:
http://communitygrids.blogspot.com/2005/11/using-maven-2-part-1.html
* Our next step is to modify the generated pom.xml files, starting with the parent.
We need to do two things:
1. Change packaging from "jar" to "pom".
2. Add <modules> tags to specify by name the child artifacts.
My modified pom.xml looks like this.
<project>
<modelVersion>4.0.0</modelVersion>
<groupId>xportlets.multitest</groupId>
<artifactId>parent</artifactId>
<version>1.0-SNAPSHOT</version>
<name>The Parent</name>
<url>http://maven.apache.org</url>
<!-- Change this to pom -->
<!-- "pom" packages don't need source code! -->
<packaging>pom</packaging>
<!-- Ad these lines -->
<modules>
<module>child1</module>
<module>child2</module>
</modules>
</project>
I note that the <module></module> values are probably artifactIds
of the associated pom.xml files. This (by default) will scan the
directory "parent" for matching sub-directories named "child1" and
"child2". A little fooling around revealed
1. Child directory names are important. The project named
"child2" must be in a directory named parent/child2.
2. There does not seem to be a way to provide alternative
locations for child projects.
* Note also that our parent project has the packaging value of "pom".
This means that the project does not need any source: it only
exists to put its pom.xml in local and remote repositories.
I was so excited, I decided to boldface the above text, since it applies to
the portlet download pom.xml files we discussed in previous blogs.
* We may also add a <parent> definition to the pom.xml files
of both of the children. This is the simple inheritance that
we saw before. I think this is optional. It seems that way from
my early tests.
<project>
<!-- Optionally add this -->
<parent>
<groupId>xportlets.multitest</groupId>
<artifactId>parent</artifactId>
<version>1.0-SNAPSHOT</version>
</parent>
<modelVersion>4.0.0</modelVersion>
<groupId>xportlets.multitest</groupId>
<artifactId>child2</artifactId>
<packaging>war</packaging>
<version>1.0-SNAPSHOT</version>
<name>Child #1</name>
<url>http://maven.apache.org</url>
<dependencies>
<dependency>
<groupId>junit</groupId>
<artifactId>junit</artifactId>
<version>3.8.1</version>
<scope>test</scope>
</dependency>
</dependencies>
<build>
<finalName>child2</finalName>
</build>
</project>
* You run all of this from the parent directory. If you issue the
command
[gateway@gridfarm002 parent]$ mvn install
You get
[INFO] Scanning for projects...
[INFO] Reactor build order:
[INFO] The Parent
[INFO] Child #1
[INFO] Child #2
...
And so on.
* After running the command, you will note that the appropriate "install" phase
build process is executed in parent and in each of the children.
* Note this is a bit different from our earlier use of inheritance,
http://communitygrids.blogspot.com/2006/01/using-maven-2-part-5-payoff-at-last.html
.
In the earlier examples, the child project would scan the local and remote repositories for
the parent's pom.xml, downloading project parts as necessary. There we were running the "mvn"
command from within the child directory. Here we are running it from within the parent.
----------------------------------------------------------------
Section 2: Inter-Project Dependencies
----------------------------------------------------------------
* The order of project builds must be deterministic if there are
dependencies.
* First, let's see what happens if I rename Child1 Child3 and update
directories, artifactIds, and names accordingly. Simply making these
superficial changes does not change the order that the modules are
executed. The order seems to be defined by the parent pom.xml's
<module> entry order. If I specify the order to be
<modules>
<module>child2</module>
<module>child3</module>
</modules>
then I get
[gateway@gridfarm002 parent]$ mvn clean install
[INFO] Scanning for projects...
[INFO] Reactor build order:
[INFO] The Parent
[INFO] Child #2
[INFO] Child #3
Switching this back to
<modules>
<module>child3</module>
<module>child2</module>
</modules>
causes Child3 to be built first.
* Ordering here is fine, but now we need to examine inter-project dependencies. Let's make
Child2 (a war build) dependent on the jar created by Child3. Add the following to your
child2's pom.xml.
<dependencies>
<dependency>
<groupId>xportlets.multitest</groupId>
<artifactId>child3</artifactId>
<version>1.0-SNAPSHOT</version>
<scope>compile</scope>
</dependency>
</dependencies>
This is the usual dependency. Also, change the module order to this:
<modules>
<module>child2</module>
<module>child3</module>
</modules>
This will prevent the cheap victory of compiling child3 first by default: we want to
force the project to check dependencies. A quick check confirms this:
[gateway@gridfarm002 parent]$ mvn install
[INFO] Scanning for projects...
[INFO] Reactor build order:
[INFO] The Parent
[INFO] Child #3
[INFO] Child #2
Removing the dependency of #2 on #3 reverses this order--it defaults to the module order.
----------------------------------------------------------------
Section 3: Dendency Management
----------------------------------------------------------------
* In a slight detour, we'll look at Maven 2's mechanism for handling
dependencies. This allows maven multi-projects to centralize their comprehensive dependency list.
This means you will need to edit only one file, for example, if you need to update a
particular jar version.
* This is described at
http://maven.apache.org/guides/introduction/introduction-to-dependency-mechanism.html
. However, I found it a bit confusing at first.
* As we have seen before, a child inherits all dependencies of its parent. However,
we often have the problem that two or more children will need to inherit a different
subset of the dependencies of the entire project. Although it makes bookkeeping simpler,
we don't want to make Child1 depend on jars that it doesn't need, just because Child2 needs them.
* For example, we have often used the Junit dependency--see the pom.xml files above. We can put this in the parent's pom.xml.
<dependencyManagement>
<dependencies>
<dependency>
<groupId>junit</groupId>
<artifactId>junit</artifactId>
<version>3.8.1</version>
<scope>test</scope>
</dependency>
</dependencies>
</dependencyManagement>
Let's say now that Child3 will need Junit but Child2 will not. Both of course extend the parent pom.xml
in the usual way. In Child3, we place following abbreviated dependency:
<dependency>
<groupId>junit</groupId>
<artifactId>junit</artifactId>
</dependency>
Note we omit the scope, version and anything else. All of this gets inherited from the parent's master definition list. In Child2 we put none of this information, and the jar will not be used in any phase of Child2's build.
* On the other hand, we may want Child2 to include junit.jar in its WAR download. This means that
junit has a different scope (compile or similar) than the default scope. We manage this by simply as follows:
<dependency>
<groupId>junit</groupId>
<artifactId>junit</artifactId>
<scope>compile</scope>
</dependency>
</dependencies>
That is, we add the <scope> parameter and override the default.
Wednesday, February 01, 2006
Using Taverna to run a HTTPS web service
The below steps outline how to run a web service on HTTPS(HHTP-SSL) using Taverna.
1. Make sure the initial set up is in place.This involves :
- Installing Axis1.3
- Installing Tomcat(latest version) and configure axis to run on tomcat
- Install Taverna
2. Configure Tomcat to run on SSL
For details, refer to the below link.
http://tomcat.apache.org/tomcat-4.0-doc/ssl-howto.html
The following steps would suffice to use the default path and password.This assumes that jdk1.5 and above is already installed.
- Create a certificate keystore :
c:\JAVA_HOME%\bin\keytool -genkey -alias tomcat -keyalg RSA and enter options as shown below.
C:\Program Files\Java\jdk1.5.0_06\bin>keytool -genkey -alias tomcat -keyalg RSA
keystore password: changeit
What is your first and last name? [Unknown]: localhost (note : this should be localhost for dev testing purposes)
What is the name of your organizational unit? [Unknown]: IUB
What is the name of your organization? [Unknown]: IUB
What is the name of your City or Locality? [Unknown]: BL
What is the name of your State or Province? [Unknown]: IN
What is the two-letter country code for this unit? [Unknown]: US
Is CN=localhost, OU=IUB, O=IUB, L=BL, ST=IN, C=US correct? [no]: y
This would create a .keystore file in the user's directory.
Note: If a keystore was created earlier with the alias tomcat, that must be deleted before executing the above commad.
c:\JAVA_HOME%\bin\keytool -delete -alias tomcat -keypass changeit
- Edit the tomcat server.xml file ($CATALINA_HOME/conf/server.xml) to uncomment the SSL
element completely. - Test the SSL by opening a browser, type https://localhost:8443. This should bring up the tomcat page.
3. Create a certificate : A certificate should be exported from the browser.The below screen shots use IE.
- Type https://localhost:8443 and the below client authentication screen will pop up .Click Ok.
- On the security alert screen click on View Certificate
- The certificate can be viewed.Click on the 'Details' tab

- On the Details tab, click 'Copy To File'

- Click next on the certificate manager export wizard

- Select a format
- Export the certificate by entering the name of the .cer file and location

- Click on Finish

- import this certificate using the below command
C:\...JRE..\bin\ keytool - keystore C:\jre\lib\security\cacerts -import -file c:\mycert.cer
Enter keystore password : changeit
Next the owner and issuer details are displayed.Verify that the CN =localhost.
Type 'y' in the prompt - Trust this certificate [no] :
The final message must be 'Certificiate was added to keystore'.
Note: If an import was done earlier, delete that alias before importing:
C:\JAVA_HOME\bin>keytool -keystore "C:\jre1.5.0_06\lib\security\cacerts" -delete -alias mykey
Enter keystore password: changeit
4. Start taverna and add a new WSDL scavenger with the WSDL URL of the webservice on https.
The 'add new WSDL scavenger' should take place successfully and it should appear in the list of processes.
5. Run the workflow and check for success message.

Wednesday, January 18, 2006
Getting Started with Taverna
A Simple Example for Taverna Workbench 1.3.1
Taverna and WSIF
Before you follow up this simple user guide for Taverna workbench 1.3.1, you may have to check the following tutorial first.
Basic Introductory Tutorial
Now let's start with "runme.bat" in MS Windows DOS command ("runme.sh" for Linux systems), and you can get the initial window as follow:
We want a simple process that concatenates two strings into a string.
Let's make two new inputs from "Advanced model explorer" panel. Right mouse click on "Workflow inputs" icon and click on "Create New Input..." from the popup dialog. You can type "String 1" on the text box of another popup dialog and click on "OK". Now, you have a new dialog in the "Workflow diagram" panel. You can have another input "String 2" following the same procedure above.
Next step is to add a process to concatenate two strings into a string.
Let's click on "Concatenate two strings" with right mouse button under "text" folder of Local Services in the "Available services" panel. Select "Add to model" from the popup dialog.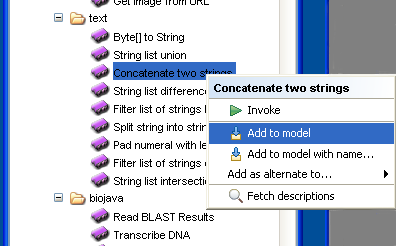
Make a workflow output. It is similar to making a workflow input in the above. This example names it as "Output string".
In the next step, let's link those workflow objects together.
Right click on "String 1" workflow input in the "Advanced model explorer" panel. Move mouse point on "Concatenate_two_strings" under "Processors" in the dialog and click on "string1" in a new subdialog. This will connect a link from "String 1" workflow input to a "string1" input of the processor. You can connect "String 2" workflow input to "string2" in the processor similarly.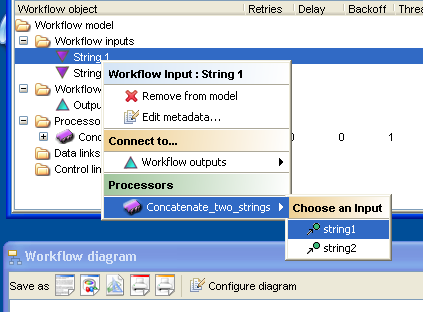
The last step for linking is a connection between the processor and the workflow output. It is a link from "output" of the processor to the workflow output. We can get the following workflow diagram.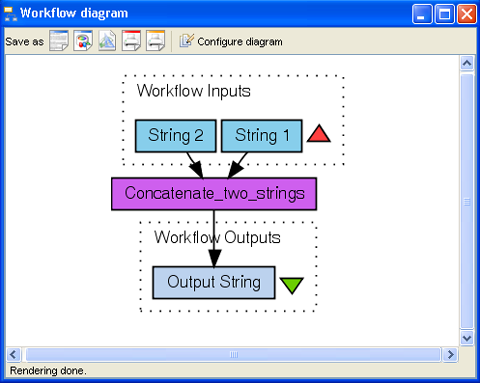
Let's run the workflow with selecting "Run workflow" menu in the main menu, "Tools and Workflow Invocation". Right click on "String 1" under "Input Document" folder in the "Run workflow" popup dialog, and select "New Input Value". And clear the default string and type in "This is". This example types in " a test." for the "String 2" input. (Don't forget a blank in the front of the second string. Because this concatenate processor is not smart.)
You can get the final result in another dialog after clicking on "Run Workflow" button.
Taverna and WSIF
by Sima Patel
summarized by Jake
Taverna allows a biologist or bioinformatician with limited computing background and limited technical resources to construct highly complex analyses over public and private data and computational resources, all from a standard PC, UNIX box or Apple computer.
Taverna uses Web Service Invocation Framework (WSIF) when connects to a particular web service using Taverna WSDL scavenger.
You can add your own Web Services on the Taverna services. For example, let's put one of Apache Axis Web Services examples. We assume that you have deployed an example in "samples/userguide/example3" of Axis package.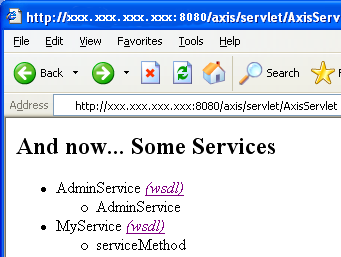
Click on the "(wsdl)" link of MyService and you can cut the WSDL URL in the address text box. Now let's right click on "Available Processors" of Available Services panel in Taverna workbench, and select "Add new WSDL scavenger...".
Paste the WSDL URL on the text box of the popup dialog, and you have a new service to invoke. Right click on "serviceMethod" processor icon and select "invoke". You can type in an input text and get a result with the same typed text.
Subscribe to:
Posts (Atom)