Wednesday, January 18, 2006

Getting Started with Taverna

A Simple Example for Taverna Workbench 1.3.1


Before you follow up this simple user guide for Taverna workbench 1.3.1, you may have to check the following tutorial first.


Basic Introductory Tutorial


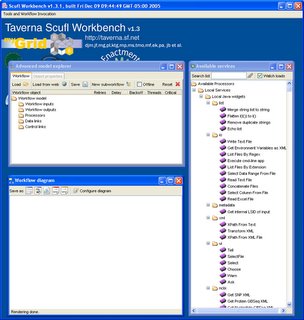
Now let's start with "runme.bat" in MS Windows DOS command ("runme.sh" for Linux systems), and you can get the initial window as follow:


We want a simple process that concatenates two strings into a string.
Let's make two new inputs from "Advanced model explorer" panel. Right mouse click on "Workflow inputs" icon and click on "Create New Input..." from the popup dialog. You can type "String 1" on the text box of another popup dialog and click on "OK". Now, you have a new dialog in the "Workflow diagram" panel. You can have another input "String 2" following the same procedure above.

Next step is to add a process to concatenate two strings into a string.
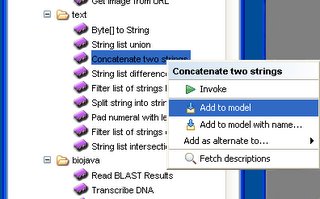
Let's click on "Concatenate two strings" with right mouse button under "text" folder of Local Services in the "Available services" panel. Select "Add to model" from the popup dialog.


Make a workflow output. It is similar to making a workflow input in the above. This example names it as "Output string".
In the next step, let's link those workflow objects together.
Right click on "String 1" workflow input in the "Advanced model explorer" panel. Move mouse point on "Concatenate_two_strings" under "Processors" in the dialog and click on "string1" in a new subdialog. This will connect a link from "String 1" workflow input to a "string1" input of the processor. You can connect "String 2" workflow input to "string2" in the processor similarly.


The last step for linking is a connection between the processor and the workflow output. It is a link from "output" of the processor to the workflow output. We can get the following workflow diagram.


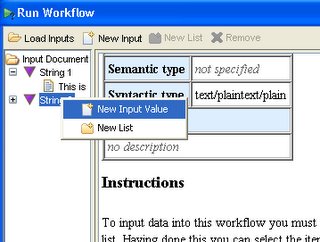
Let's run the workflow with selecting "Run workflow" menu in the main menu, "Tools and Workflow Invocation". Right click on "String 1" under "Input Document" folder in the "Run workflow" popup dialog, and select "New Input Value". And clear the default string and type in "This is". This example types in " a test." for the "String 2" input. (Don't forget a blank in the front of the second string. Because this concatenate processor is not smart.)


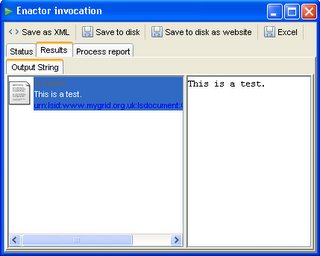
You can get the final result in another dialog after clicking on "Run Workflow" button.


Taverna and WSIF
by Sima Patel

summarized by Jake


Taverna allows a biologist or bioinformatician with limited computing background and limited technical resources to construct highly complex analyses over public and private data and computational resources, all from a standard PC, UNIX box or Apple computer.


Taverna uses Web Service Invocation Framework (WSIF) when connects to a particular web service using Taverna WSDL scavenger.


WSIF - Known restrictions


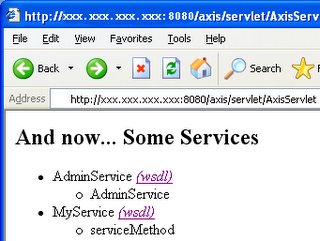
You can add your own Web Services on the Taverna services. For example, let's put one of Apache Axis Web Services examples. We assume that you have deployed an example in "samples/userguide/example3" of Axis package.


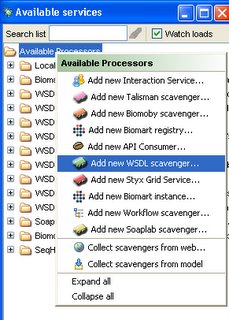
Click on the "(wsdl)" link of MyService and you can cut the WSDL URL in the address text box. Now let's right click on "Available Processors" of Available Services panel in Taverna workbench, and select "Add new WSDL scavenger...".


Paste the WSDL URL on the text box of the popup dialog, and you have a new service to invoke. Right click on "serviceMethod" processor icon and select "invoke". You can type in an input text and get a result with the same typed text.

Tuesday, January 17, 2006

Using Maven 2, Part 5: Payoff at Last

****************************************************************
Maven 2 Notes, Part 5: Portlet Plugins
****************************************************************

----------------------------------------------------------------
Section 1: Portlet Plugin Use Cases
----------------------------------------------------------------

* My overarching goal in these notes has been to develop a method
for making Grid Portals easier to assemble from remote repositories.
This really amounts to downloading pre-compiled WAR files and putting them
into a Tomcat container.

* That said, we have the following basic problem to solve: a particular
Grid Portlet WAR file may require other steps to occur:
o The portlet depends on another portlet (ie proxy manager is required for job submission).
o The portlet depends on various jars being placed into Tomcat's common/lib or shared/lib.
o The portlet depends upon particular modifications and patches being applied to the container.
o The portlet depends upon additional services, which may need to be installed at the same time.

* To be clear, I use "dependency" in a looser sense than normally in Maven: I just mean that
a particular portlet won't work at _runtime_ without some other pieces. I don't necessarily
mean that the dependent portlet requires the other code for _compilation_.

* An example of the third case is a portlet that depends on an extension to the GridSphere or
Jetspeed2 authentication mechanism.

* Examples of the fourth case include portlets that work with Sakai collaboration services. I single these
out because they can be installed also with Maven, so it will be an "intermediate" use case that
we will tackle in the future.

----------------------------------------------------------------
Section 2: Use Case #1: Downloading Dependent Portlets
----------------------------------------------------------------
* We assume the following: Portlet B depends upon Portlet A also being installed.
Both portlets are compiled as WAR files and are available from a remote repository. We
download the POM file for Portlet B.

* Maven basically gives us two ways of going this:
o Dependencies
o Inheritance

* These are not exclusive and in fact it may be good to combine them.

* Let's build this up. We will do the following steps:
1. Make a proxymanager-portlet.war portlet and deploy it to a remote repository.
2. Make a gridftp-portlet.war portlet and deploy it to a remote repository.
3. Make a generic-grid-portlet.war and deploy it also to the repo.
4. Finally, make a pom.xml for gridftp-portlet-download that inherits from generic-grid-portlet.

Note step 3 creates a war, but we are really only interested in deploying its pom.xml file to the
repo.

Note also we need to distinguish between #2 and #4. #2 is done by the developer of the portlet, while
#4 is done by the downloader of the portlet. Note also that only Step 4 requires the plugin that
we developed in the previous sections of this report. However, we will inherit it through a generic
parent (#3).

* Here is the pom.xml for the straw proxymanager-portlet:

<project>
<modelVersion>4.0.0</modelVersion>
<groupId>xportlets.proxymanager</groupId>
<artifactId>proxymanager-portlet</artifactId>
<packaging>war</packaging>
<version>2.0</version>
<name>Maven Webapp Archetype</name>
<url>http://maven.apache.org</url>
<build>
<finalName>proxymanager-portlet</finalName>
</build>
<dependencies>
<dependency>
<groupId>junit</groupId>
<artifactId>junit</artifactId>
<version>3.8.1</version>
</dependency>
</dependencies>
<distributionManagement>
<repository>
<id>Test</id>
<url>file:///tmp/Test/</url>
</repository>
</distributionManagement>
</project>

The main thing to note is that we are using our own "internal" (not to be confused with "local") repository
to stow our proxymanager-portlet.war.

We deploy this in the usual way:

[shell-prompt> mvn deploy

* Do the same for the straw gridftp-portlet. It should have a very similar pom.xml.
<project>
<modelVersion>4.0.0</modelVersion>
<groupId>xportlets.gridftp</groupId>
<artifactId>gridftp-portlet</artifactId>
<packaging>war</packaging>
<version>2.0</version>
<name>Maven Webapp Archetype</name>
<url>http://maven.apache.org</url>
<build>
<finalName>gridftp-portlet</finalName>
</build>
<dependencies>
<dependency>
<groupId>junit</groupId>
<artifactId>junit</artifactId>
<version>3.8.1</version>
<scope>provided</scope>
</dependency>
</dependencies>
<distributionManagement>
<repository>
<id>Test</id>
<url>file:///tmp/Test/</url>
</repository>
</distributionManagement>
</project>

* Here is the pom.xml for the the generic-grid-portlet:
<project>
<modelVersion>4.0.0</modelVersion>
<groupId>ogce.portlets</groupId>
<artifactId>GenericGridPortlet</artifactId>
<packaging>war</packaging>
<version>1.0</version>
<name>Maven Webapp Archetype</name>
<url>http://maven.apache.org</url>
<repositories>
<repository>
<id>blah</id>
<url>file:///tmp/Test/</url>
</repository>
</repositories>
<build>
<finalName>generic-grid-portlet</finalName>
<plugins>
<plugin>
<artifactId>PortletAppPlugin</artifactId>
<groupId>test.plugin</groupId>
<executions>
<execution>
<phase>process-resources</phase>
<configuration>
<destinationDir>
/tmp/
</destinationDir>
</configuration>
<goals>
<goal>portlet-war-deploy</goal>
</goals>
</execution>
</executions>
</plugin>
</plugins>
</build>
<dependencies>
<!-- Note this is a war! -->
<dependency>
<groupId>xportlets.proxymanager</groupId>
<artifactId>proxymanager-portlet</artifactId>
<version>2.0</version>
<type>war</type>
</dependency>
<dependency>
<groupId>junit</groupId>
<artifactId>junit</artifactId>
<version>3.8.1</version>
<scope>test</scope>
</dependency>
</dependencies>

<distributionManagement>
<repository>
<id>Test</id>
<url>file:///tmp/Test/</url>
</repository>
</distributionManagement>

</project>


Note again that we specify the internal repository for both reading (top) and writing (bottom). These don't
really need to be the same. Also, we specify the proxymanager-portlet.war file as being a dependency. Again,
this "dependency" is not for compilation and classpath, but just to force the download of this war into the
local ($HOME/.m2) repository.

We also deploy this in the usual way:

[shell-prompt> cd $YOUR_TESTS/GenericGridPortlet
[shell-prompt> mvn deploy

By deploying this portlet, we stick its pom.xml in the repository. Keep reading.

* Now, finally, we can create our distribution POM. It is shown below. Note that it inherits
several things from the GenericGridPortlet parent: the dependency on proxymanager-portlet.war,
the PortletAppPlugin, and so on.

* On the other hand, we do need to specify the internal repository to bootstrap everything.

* Note also that we ONLY have to distribute the following pom.xml file. It will download
anything it needs from the specified repositories, including the GenericGridPortlet pom.xml.


<project>
<parent>
<artifactId>GenericGridPortlet</artifactId>
<groupId>ogce.portlets</groupId>
<version>1.0</version>
</parent>
<!-- Must specify this to bootstrap things. -->
<repositories>
<repository>
<id>blah</id>
<url>file:///tmp/Test/</url>
</repository>
</repositories>
<modelVersion>4.0.0</modelVersion>
<groupId>xportlets.gridftp</groupId>
<artifactId>gridftp-downloader</artifactId>
<packaging>war</packaging>
<version>2.0</version>
<name>Maven Webapp Archetype</name>
<url>http://maven.apache.org</url>
<build>
<finalName>gridftp-downloader</finalName>
</build>
<dependencies>
<dependency>
<groupId>xportlets.gridftp</groupId>
<artifactId>gridftp-portlet</artifactId>
<version>2.0</version>
<type>war</type>
</dependency>
</dependencies>
</project>


* If you run this portlet, the following output is generated:

[gateway@gridfarm002 gridftp-downloader]$ mvn process-resources
[INFO] Scanning for projects...
Downloading: file:///tmp/Test//ogce/portlets/GenericGridPortlet/1.0/GenericGridPortlet-1.0.pom
1K downloaded
[INFO] ----------------------------------------------------------------------------
[INFO] Building Maven Webapp Archetype
[INFO] task-segment: [process-resources]
[INFO] ----------------------------------------------------------------------------
[INFO] [resources:resources]
[INFO] Using default encoding to copy filtered resources.
[INFO] [PortletAppPlugin:portlet-war-deploy {execution: default}]
[INFO] Hollow World!
Sample Param: 2.0
junit
/home/gateway/.m2/repository/junit/junit/3.8.1/junit-3.8.1.jar
/tmp/junit-3.8.1.jar
121070
xportlets.proxymanager
/home/gateway/.m2/repository/xportlets/proxymanager/proxymanager-portlet/2.0/proxymanager-portlet-2.0.war
/tmp/proxymanager-portlet-2.0.war
112097
xportlets.gridftp
/home/gateway/.m2/repository/xportlets/gridftp/gridftp-portlet/2.0/gridftp-portlet-2.0.war
/tmp/gridftp-portlet-2.0.war
3386
[INFO] ----------------------------------------------------------------------------
[INFO] BUILD SUCCESSFUL
[INFO] ----------------------------------------------------------------------------
[INFO] Total time: 1 second
[INFO] Finished at: Tue Jan 17 14:01:29 EST 2006
[INFO] Final Memory: 2M/4M
[INFO] ----------------------------------------------------------------------------


* This output is somewhat obscure, but it basically means that everything worked correctly: the
gridftp-downloader project pulled down the GenericGridPortlet's pom.xml file. It then downloaded
gridftp-portlet.war, as was specified explicitly in its dependencies. It also downloaded the
proxymanager-portlet.war file, which is a dependency that it inherits from GenericGridPortlet.
Finally, it ran the PortletAppPlugin (also inherited from GenericGridPorltet).

* So in summary, this can be used to download portlet WAR files and their supporting WARs.

----------------------------------------------------------------
Section 3: Use Case #2: External jar dependencies
----------------------------------------------------------------
* It is often the case that our portlets must depend on jars that do not get included in the
WAR bundle because they will be placed in Tomcat's common/lib/ or shared/lib/ directory. In the
OGCE project, the COG Jars needed to work with Grid resources are the main example.

* This is actually a more straightforward application of Maven. Our gridftp-downloader's pom.xml POM
shown above actually does not need to change at all. The GenericGridPortlet's pom.xml may contain
all of the CoG jar dependencies, or it may itself inherit this from GrandfatherCOG, yet another pom.xml.

* The actual steps needed to download the copy the COG jars from the repo to the Tomcat /shared/lib
directory can be easily based on our PortletAppPlugin code.

----------------------------------------------------------------
Section 4: Use Cases #3 and #4: Answer unclear, ask again later.
----------------------------------------------------------------
* These require a bit more thought, so I'll describe them in follow up posts.
Monday, January 16, 2006

Maven Part 4: Plugin Fun

****************************************************************
Maven 2 Notes, Part 4
****************************************************************

----------------------------------------------------------------
Section 1: Using a plugin in another project
----------------------------------------------------------------

* In part 3 of this series, we looked at how to write a plugin and
invoke it as a stand-alone application. This is useful for testing,
but now let's look at how to use our plugin in another project.

* Let's call our project "jobsubmit-portlet" for historical reasons. The
entire pom.xml is shown below. I removed the namespace definitions
from the <project> but these are standard.

<project>
<modelVersion>4.0.0</modelVersion>
<groupId>xportlets.jobsubmit</groupId>
<artifactId>jobsubmit-portlet</artifactId>
<packaging>war</packaging>
<version>2.0</version>
<name>Maven Webapp Archetype</name>
<url>http://maven.apache.org</url>
<build>
<finalName>jobsubmit-portlet</finalName>
<plugins>
<!-- This is the Ant plugin -->
<plugin>
<artifactId>maven-antrun-plugin</artifactId>
<executions>
<execution>
<phase>process-resources</phase>
<configuration>
<tasks>
<echo message="${pom.dependencies}"/>
</tasks>
</configuration>
<goals>
<goal>run</goal>
</goals>
</execution>
</executions>
</plugin>
<!-- This is our test plugin -->
<plugin>
<artifactId>PortletAppPlugin</artifactId>
<groupId>test.plugin</groupId>
<executions>
<execution>
<!-- Specify the phase that needs to execute the plugin -->
<phase>process-resources</phase>
<configuration>
<!-- We are going to override this value -->
<!-- We saw earlier that ${settings} gives us access to maven's
"system" properties. -->
<sampleParam>
${settings.localRepository}
</sampleParam>
</configuration>
<goals>
<goal>portlet-war-deploy</goal>
</goals>
</execution>
</executions>
</plugin>
</plugins>
</build>
<dependencies>
<dependency>
<groupId>junit</groupId>
<artifactId>junit</artifactId>
<version>3.8.1</version>
<scope>provided</scope>
</dependency>
</dependencies>

</project>

* You should first note that the plugin applies to the "process-resources" phase of our
build cycle, so the minimal command to run is

[shell-prompt> mvn clean process-resources

I add the "clean" goal just to force cleanup. We get as output

[gateway@gridfarm002 jobsubmit-portlet]$ mvn clean process-resources
[INFO] Scanning for projects...
[INFO] ----------------------------------------------------------------------------
[INFO] Building Maven Webapp Archetype
[INFO] task-segment: [clean, process-resources]
[INFO] ----------------------------------------------------------------------------
[INFO] [clean:clean]
[INFO] Deleting directory /home/gateway/Maven2Tests/jobsubmit-portlet/target
[INFO] [resources:resources]
[INFO] Using default encoding to copy filtered resources.
[INFO] [antrun:run {execution: default}]
[INFO] Executing tasks
[echo] [Dependency {groupId=junit, artifactId=junit, version=3.8.1, type=jar}]
[INFO] Executed tasks
[INFO] [PortletAppPlugin:portlet-war-deploy {execution: default}]
[INFO] Hollow World!
Sample Param: /home/gateway/.m2/repository
Artifact ID: junit
groupId: junit
[INFO] ----------------------------------------------------------------------------
[INFO] BUILD SUCCESSFUL
[INFO] ----------------------------------------------------------------------------
[INFO] Total time: 2 seconds
[INFO] Finished at: Mon Jan 16 13:51:02 EST 2006
[INFO] Final Memory: 2M/5M
[INFO] ----------------------------------------------------------------------------


* You should also, comparing this to the previous "standalone" test, note that the value of the
parameter <sampleParams> replaces the default value defined in the plugin code. That code is
shown again below. The default value is ${project.version}.

/**
* Sample parameter setting.
* @parameter expression="${project.version}"
*/
private String sampleParam;

* You should also note that the dependencies are listed correctly after "Sample Params". The "Executing tasks" line is
a holdover from our experiments with Apache Ant.

----------------------------------------------------------------
Section 2: Dipping into the repository with a plugin.
----------------------------------------------------------------

* So far we have seen how to discover the local repository's path and how to
extract the project dependencies programmatically with a plugin. Now
let's look at how to construct a real path to a particular

* The following plugin code will do the trick. Note I had to
construct the actual file path to the repository file
using the private pathResolver() method. There may be an
official Maven 2 way of doing this, which would guard against
directory layout convention changes if it exists.

* Also note the useful deps.getType(), which returns ".war" or
".jar" or whatever.


package test.plugin;

import org.apache.maven.plugin.AbstractMojo;
import org.apache.maven.plugin.MojoExecutionException;

import org.apache.maven.model.Dependency;
import java.util.ArrayList;
import java.io.File;
import java.io.FileOutputStream;
import java.io.FileInputStream;
import java.nio.channels.FileChannel;

/**
* @goal portlet-war-deploy
* @description Copy a war to a tomcat directory.
*/
public class PortletAppPlugin extends AbstractMojo {

String groupId="";
String artifactId="";
String version="";

public void execute() throws MojoExecutionException
{
getLog().info("Hollow World!");

for(int i=0; i<theDepends.size();i++) {
Dependency deps=(Dependency)theDepends.get(i);
String repositoryPath=pathResolver(deps);
File theDepFile=new File(repositoryPath);
File destFile=new File(destinationDir+
File.separator+theDepFile.getName());

System.out.println(repositoryPath);
System.out.println(destFile);

if(!isValidFilePath(theDepFile))
throw new MojoExecutionException("ouch");

try {
copyFile(theDepFile,destFile);
}
catch (Exception ex) {
System.err.println(ex.getMessage());
}

//Confirm the write succeeded.
if(!isValidFilePath(destFile))
throw new MojoExecutionException("ouch");

}
}

/**
* Copies one file to another. This uses NIO. I based this
* on examples from David Flanagan's "Java in a Nutshell"
* from O'Reilly.
*/
private void copyFile(File repo, File dest) throws Exception{
FileInputStream fin=new FileInputStream(repo);
FileOutputStream fout=new FileOutputStream(dest);

FileChannel fc_in=fin.getChannel();
FileChannel fc_out=fout.getChannel();

fc_in.transferTo(0,fc_in.size(),fc_out);
fc_in.close();
fc_out.close();
}

/**
* Verifies that the indicated file actually exists.
*/
private boolean isValidFilePath(File testFile) {
if(!testFile.exists()) {
return testFile.exists();
}
else {
return testFile.isFile();
}
}

/**
* Converts a dependency into a file path.
*/
private String pathResolver(Dependency deps) {
String repositoryPath="";
repositoryPath+=localRepo+File.separator;
repositoryPath+=resolveGroup(deps.getGroupId())+File.separator;
repositoryPath+=deps.getArtifactId()+File.separator;
repositoryPath+=deps.getVersion()+File.separator;
repositoryPath+=deps.getArtifactId()+"-"+deps.getVersion()+".";
repositoryPath+=deps.getType();

return repositoryPath;
}

private String resolveGroup(String groupId) {
String correctedGroupId="";
System.out.println(groupId);
if(groupId.indexOf(".")<0) {
correctedGroupId=groupId;
}
else {
//replaceAll() uses regexp to replace macthes,
//so we need to use a double escape to avoid
//interpration of "." as match all: "."-->"\\."
correctedGroupId=groupId.replaceAll("\\.",File.separator);
}
return correctedGroupId;
}

/**
* Sample parameter setting.
* @parameter expression="${project.version}"
*/
private String sampleParam;

/**
* Repository path parameter setting.
* @parameter expression="${settings.localRepository}"
*/
private String localRepo;

/**
* Second sample parameter setting.
* @parameter expression="${project.dependencies}"
*/
private ArrayList theDepends;

/**
* Second sample parameter setting.
* @parameter expression="/tmp/"
*/
private String destinationDir;
}

* You can test this plugin as usual by running the command

[shell-prompt> mvn clean compile test.plugin:PortletAppPlugin:1.0-SNAPSHOT:portlet-war-deploy

in the plugin's project directory.

* But you really want to use this in another project, as discussed above. We
change the pom.xml of our project descriptor above to look like this:

<project>
<modelVersion>4.0.0</modelVersion>
<groupId>xportlets.jobsubmit</groupId>
<artifactId>jobsubmit-portlet</artifactId>
<packaging>war</packaging>
<version>2.0</version>
<name>Maven Webapp Archetype</name>
<url>http://maven.apache.org</url>
<build>
<finalName>jobsubmit-portlet</finalName>
<plugins>
<plugin>
<artifactId>PortletAppPlugin</artifactId>
<groupId>test.plugin</groupId>
<executions>
<execution>
<phase>process-resources</phase>
<configuration>
<destinationDir>
/tmp/
</destinationDir>
</configuration>
<goals>
<goal>portlet-war-deploy</goal>
</goals>
</execution>
</executions>
</plugin>
</plugins>
</build>
<dependencies>
<dependency>
<groupId>junit</groupId>
<artifactId>junit</artifactId>
<version>3.8.1</version>
<scope>provided</scope>
</dependency>
</dependencies>
</project>

* This is used for copying all of the dependencies (the junit jar file in this
case) to the value of the parameter <destinationDir>. The plugin comes with
several other properties (localRepo, theDepends), but the default values are
almost always acceptable.

Wednesday, January 11, 2006

New framework for Ajax (soon open Source)

ClearNova AJAX platform released as open source

1/10/2006
By ADT Staff

ClearNova is releasing ThinkCAP JX, a visual dev environment for building rich Internet apps with AJAX, as open source. ThinkCAP JX is a RAD platform that combines the power of AJAX, J2EE and open source to enable orgs and their developers to quickly build Web-based apps.

The platform is available for download at www.thinkcap.org. In late February, the project Web site will be the location for community feedback, shared experiences, bug fixes, feature requests and sharing knowledge with other users.

"Our customers, as well as the 750 organizations that downloaded our beta have spoken loud and clear: they want an open-source, royalty-free framework and engine that allows them to fully exploit the collaborative nature of the community and that does not lock them into a proprietary run-time," says Byron Matheson, CEO of ClearNova.

ThinkCAP JX allows Java and 4GL developers to rapidly build apps without having to become JavaScript experts. The platform provides event-driven AJAX dev so developers can code on either the client or the server or both. Because developers can leverage Java to make changes to the user interface, it is easier for them to develop and maintain the application. ThinkCAP JX can also be used to add AJAX functionality to existing Java applications.

The ThinkCAP JX Framework integrates almost 25 open-source frameworks and engines including Struts and Hibernate and provides a seamless framework that ties them all together. It is licensed under the GNU Public License (GPL). For software vendors and other orgs wishing to distribute ThinkCAP JX without having to distribute their source code, a royalty-free commercial ThinkCAP JX license is available for $2,000 per developer. ThinkCAP Workbench, a visual design environment, is available at a $499 subscription price per year and includes documentation and technical support. The Workbench is not required to build apps in the ThinkCAP JX Framework.


Monday, January 09, 2006

English Writing Guidelines

A GUIDE FOR THE VEXED
I often help edit papers and reports written by international graduate students who speak and write English as a second language. The hopefully helpful guidelines below are drawn from these experiences. I'm no grammar maven: these are presented in the spirit of practice rather than theory.

DISCLAIMER
* I reserve the right to violate any of the guidelines below.

RECOMMENDED WRITING GUIDES
* "The Elements of Style" by William Strunk and E. B. White is a popular guide to writing American English. It is concise (105 pages),cheap (<$10), and available at any bookstore. E. B. White also wrote several famous books for children. Draw your own conclusions.

* The Chicago Manual of Style is a more complete guideline to word usage, punctuation, etc.

GENERAL ADVICE
* Always re-read and rewrite several times.

* Keep it simple. If your sentences are several lines long with many commas and conjunctions, break them up into shorter pieces.

* Brevity, clarity, and precision are the highest virtues.

* Writing improves with practice. This rule applies to both native and non-native speakers.

* All these rules assume you have something to write. Decide what information you need to convey before you get started. Outlines, notes, and presentations slides are all helpful for organizing your material.

* You must edit and revise often. It is extremely difficult to make an error-free document.

* Recruit others to proofread and critique your writing.

NOUNS AND THEIR ARTICLES
* Nouns (subjects and objects of sentences and phrases) almost always require an article (a, an, or the) when singular. This is a common stumbling block for writers who don't natively speak an Indo-European language.

* Choosing between "a/an" and "the" is not always clear and hard to explain. As a guide,

- Use "the" to refer to something specific. If you can replace "the" in your sentence with "this", "that", "these", or "those", then "the" is appropriate. Also, if a possessive pronoun (his, her, their, my, your) makes sense in front of the noun, then "the" is also appropriate.

- Use "a/an" for a general, unspecified noun.

* Don't overuse proper (capitalized) nouns. These refer to specific people, places, organizations, or activities. For example, "the Internet" is commonly treated as a proper noun, and the Internet Engineering Task Force is the name of an organization, but the general phrase "Internet-based remote invocation protocols" should not be capitalized throughout.

* The distinction between common and proper nouns is sometimes vague, so if in doubt, don't capitalize. If still in doubt, follow precedents from your references.

* When using abbreviations, always put the full name first, followed by the abbreviation in parenthesis. For example, use the format "Community Grids Lab (CGL)".

- You should (almost) never use undefined abbreviations. Even well know ones like "HTTP", "XML", and "URL" should often be defined. You may violate this rule for extremely familiar abbreviations in page-limited papers for an expert audience, but follow it otherwise.

- You should avoid introducing too many new abbreviations. As a rule of thumb, only define your own abbreviations if you must refer to something three or more times in the text and only if you need to save space. This is a useful trick for saving some space in page-limited papers, but it is annoying and should be avoided.

* Be consistent. For example, if you use "Web Services", "Web services", or "web services" in one place in your document, use the same capitalization convention for all other instances.

VERBS AND TENSES
* You should normally use either the present tense ("We research", "We develop") or the present perfect tense ("We have researched..."). Only use past verb tenses when you need to demonstrate the diffence in the present: "We previously developed X 1.0 in the past but have now replaced it with X 2.0".

COMMAS
* Strunk and White can provide rules for using commas. As a general guideline, you use commas in long sentences to tell the reader when to pause and take a mental breath. They are also useful for clarification. Something like "As we have often shown messaging systems which can route SOAP messages are excellent things" can be written "As we have often shown, messaging systems, which can route SOAP messages, are excellent things." Read both versions aloud, pausing briefly at the commas in the second version.

* The sentence above is still terrible. If you find your self writing this way, revise and simplify.

* Don't separate complete sentences with commas (this is called comma-splicing and is one of the deadly sins of grammar). Use periods, semicolons, or colons instead. On second thought, just use periods. Semicolons and colons should be used rarely.

PARAGRAPHS
* A paragraph should be about just one idea. I usually like to keep them short as well. As a general rule, your reader should be able to read paragraph N, ponder what you are talking about, and then read paragraph N+1 without having to re-read paragraph N.

* As another general rule, paragraphs should be at least 3 sentences long.

* If you follow my brevity rule, they should contain at most 5-6 sentences.

BIBLIOGRAPHIES AND REFERENCES
* Only use web sites as references when talking about the actual web site. For example, www.naradabrokering.org and www.globalmmcs.org are NOT references for NaradaBrokering and GlobalMMCS research work.

* Similarly, when referring to IETF, W3C, and OASIS standards, always refer to the document by its full title, authors, and publication date. Don't simply give the URL.

* Collect as many non-lab references for you papers as possible. If Geoffrey Fox is a co-author in every one of your references, reviewers can claim that you have not adequately surveyed the field. Even worse, you may have omitted some of the reviewer's own publications on the subject, which will not please him or her.

MISCELLANEOUS TIPS
* Avoid using "/" to separate words. Common examples include "and/or" and "request/response". This is lazy writing, so don't do this.

* Avoid writing sentences that try to make too many points. A sentence should (as a guideline) make a single point. If you need to make more points, use more sentences.

* Short, crisp sentences are best. Your sentences will meander and drift if you use too many conjunctions and clauses. Always try to make your sentences shorter when you edit.

Friday, January 06, 2006

Books I have purchased

Hollow World!

1. JavaServer Faces in Action
2. Service-Oriented Architecture: Concepts, Technology and Design
3. Ant: Developer's Handbook
4. Extreme Programming with Ant: Building and Deploying Java - Applications with
JSP, EJB, XSLT, XDoclet and JUnit
5. Foundations of Ajax